3 Graphical representation
Graphs and diagrams play a vital role in statistics by transforming complex data into clear, visual formats that are easier to interpret and analyze. While frequency distributions in tabular form help organize raw data, graphical representations provide a more intuitive way to understand patterns, trends, and relationships within the data. By converting numbers into visual elements, graphs make it simpler to convey information effectively, making them indispensable tools in research, analysis, and communication. Depending on the nature of the data and the intended purpose, various types of graphs and diagrams can be employed to illustrate key insights. This chapter focuses on the fundamental graphs and charts used in statistics to visually represent data.
3.1 Histogram
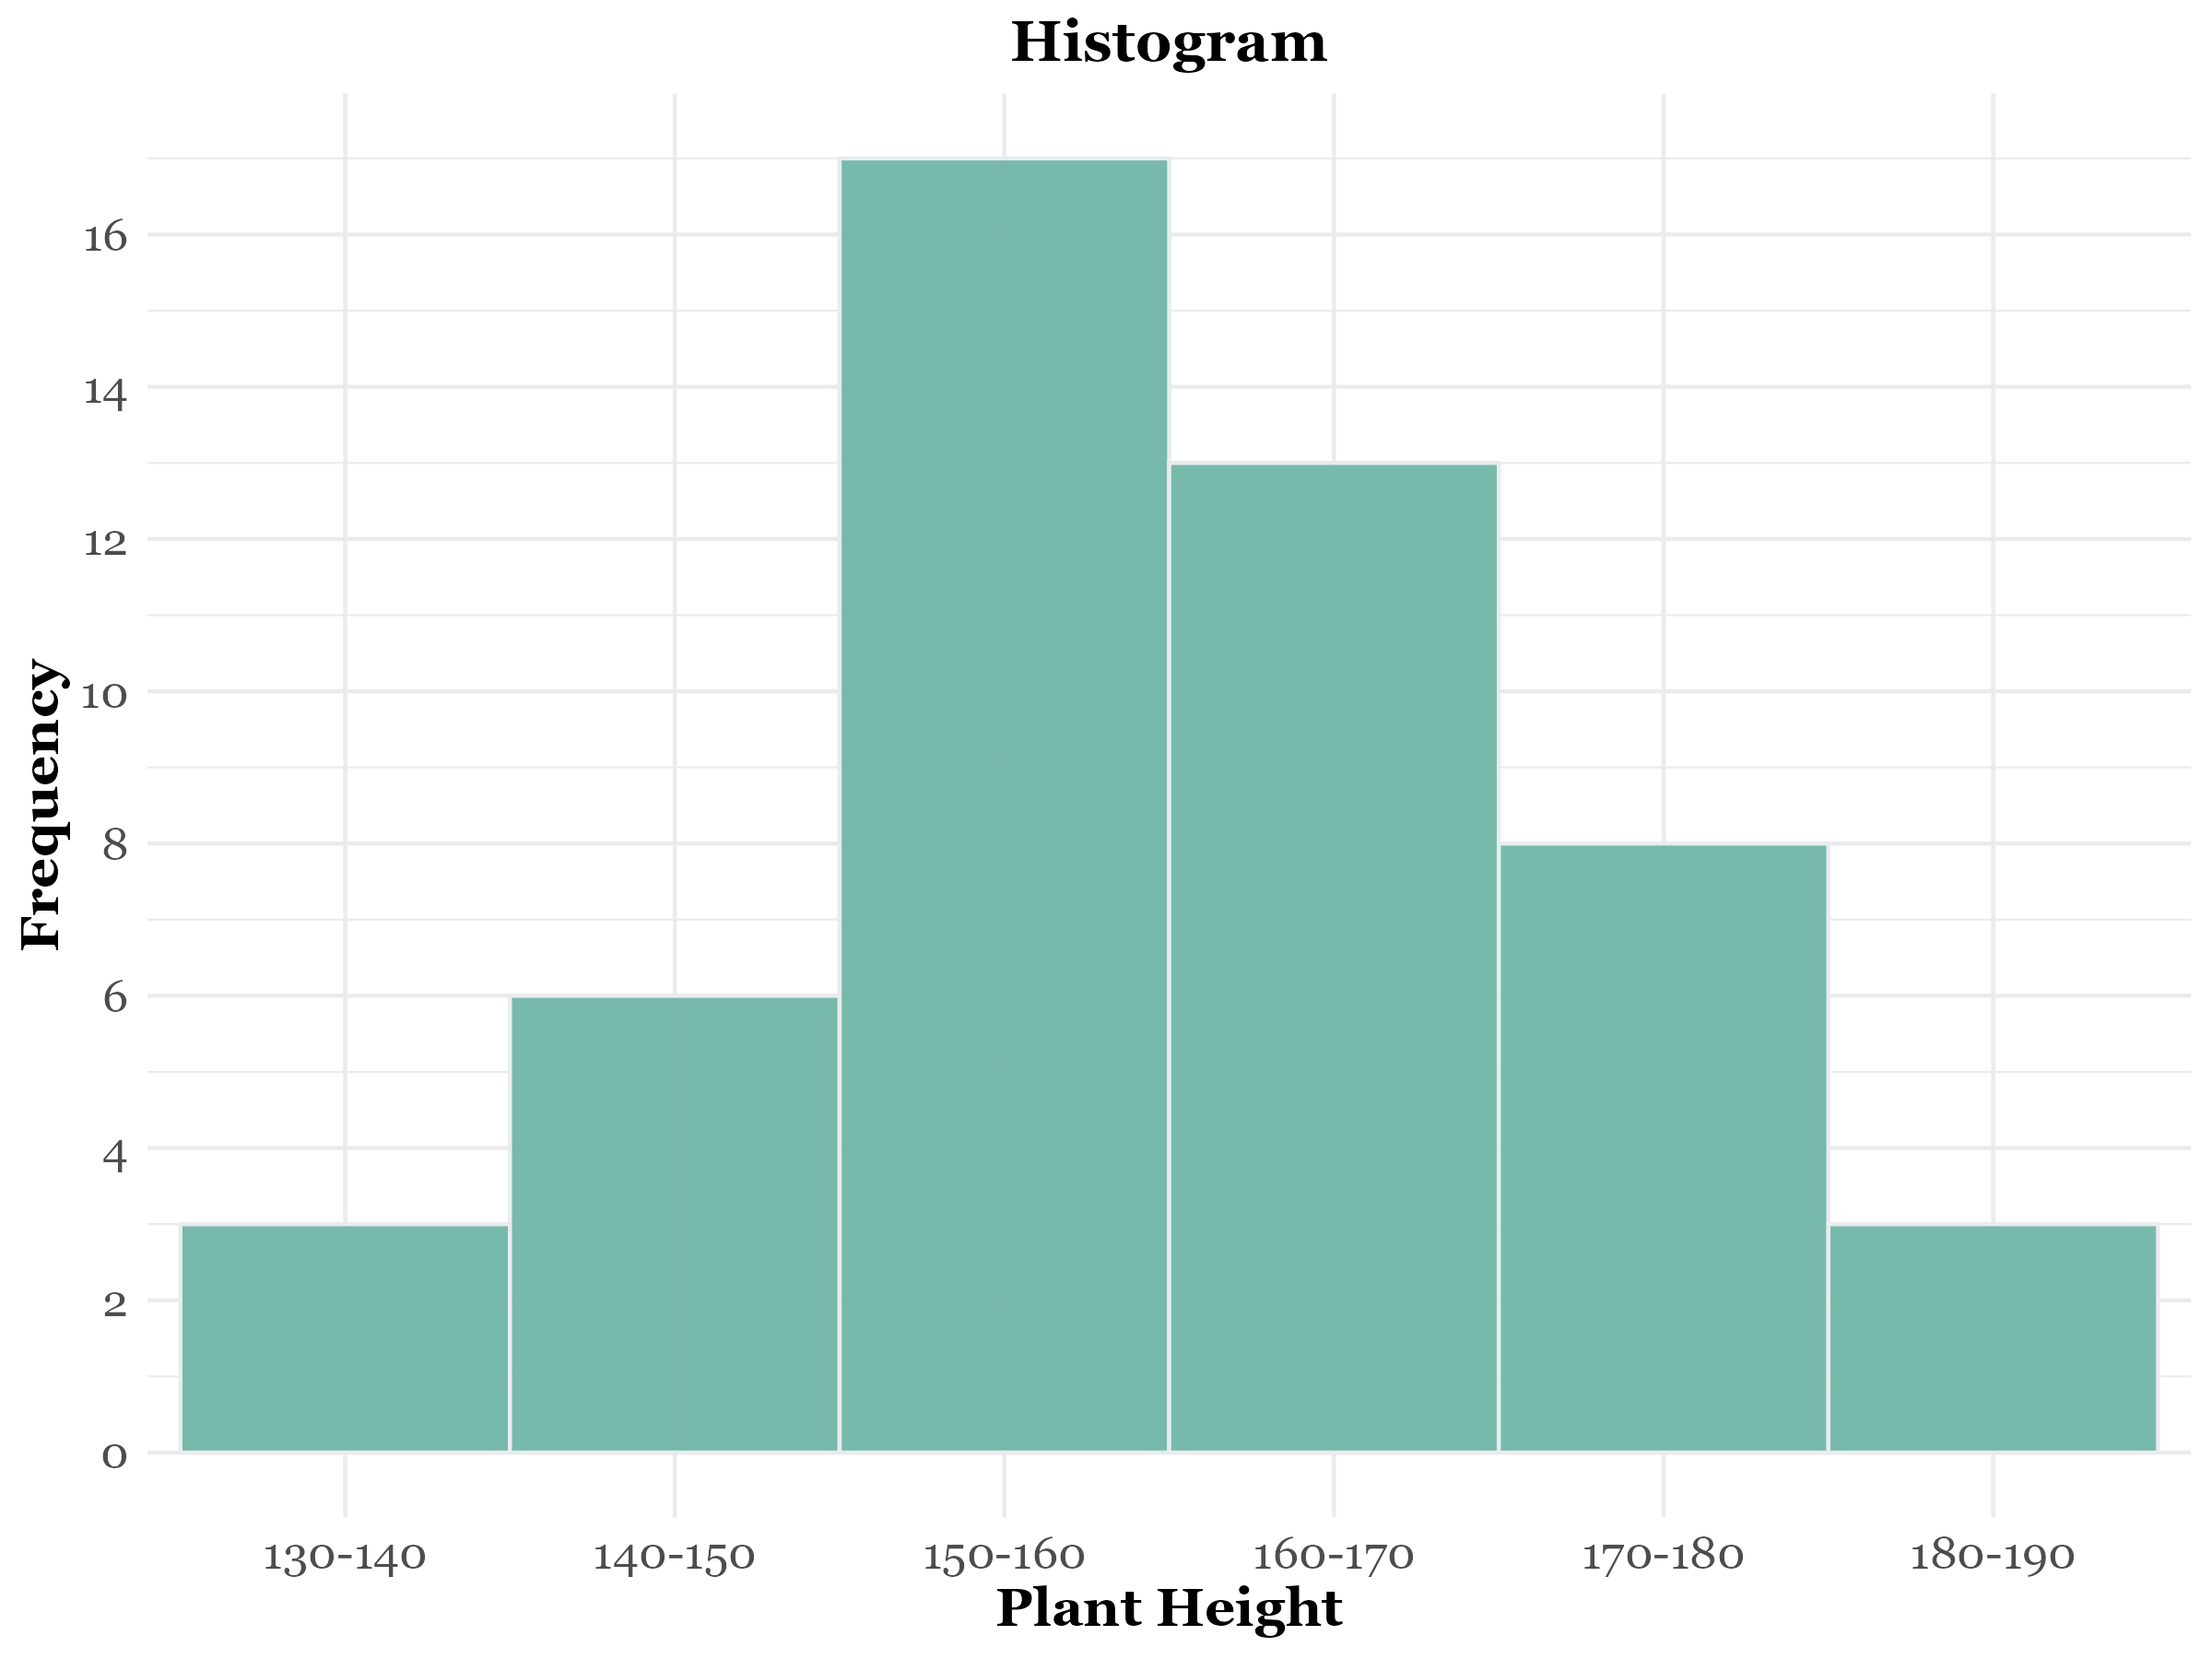
A histogram is a graphical representation used to display the frequency distribution of continuous data. It consists of adjacent rectangles, where:
- The base of each rectangle lies along the horizontal axis, with the width determined by the class intervals.
- The height of each rectangle is proportional to the frequency of the corresponding class.
Unlike bar charts, histograms have no gaps between the rectangles, emphasizing the continuity of the data. The height of each rectangle represents the frequency for equal-width classes. Histograms are effective tools for visualizing data distribution, identifying patterns, and highlighting skewness or outliers.
If the class intervals are of equal width, the height of each rectangle in a histogram is directly proportional to the class frequency. In such cases, the class frequencies can be used as the heights of the rectangles.
However, when class intervals have varying widths, the height of each rectangle should be proportional to the frequency density, which is calculated as:
\[ \text{Frequency Density} = \frac{\text{Class Frequency}}{\text{Class Width}} \]
In these cases, the frequency density is plotted on the y-axis to ensure that the area of each rectangle accurately represents the frequency of the class. This approach maintains the correct visual representation of the data distribution regardless of the class interval widths.
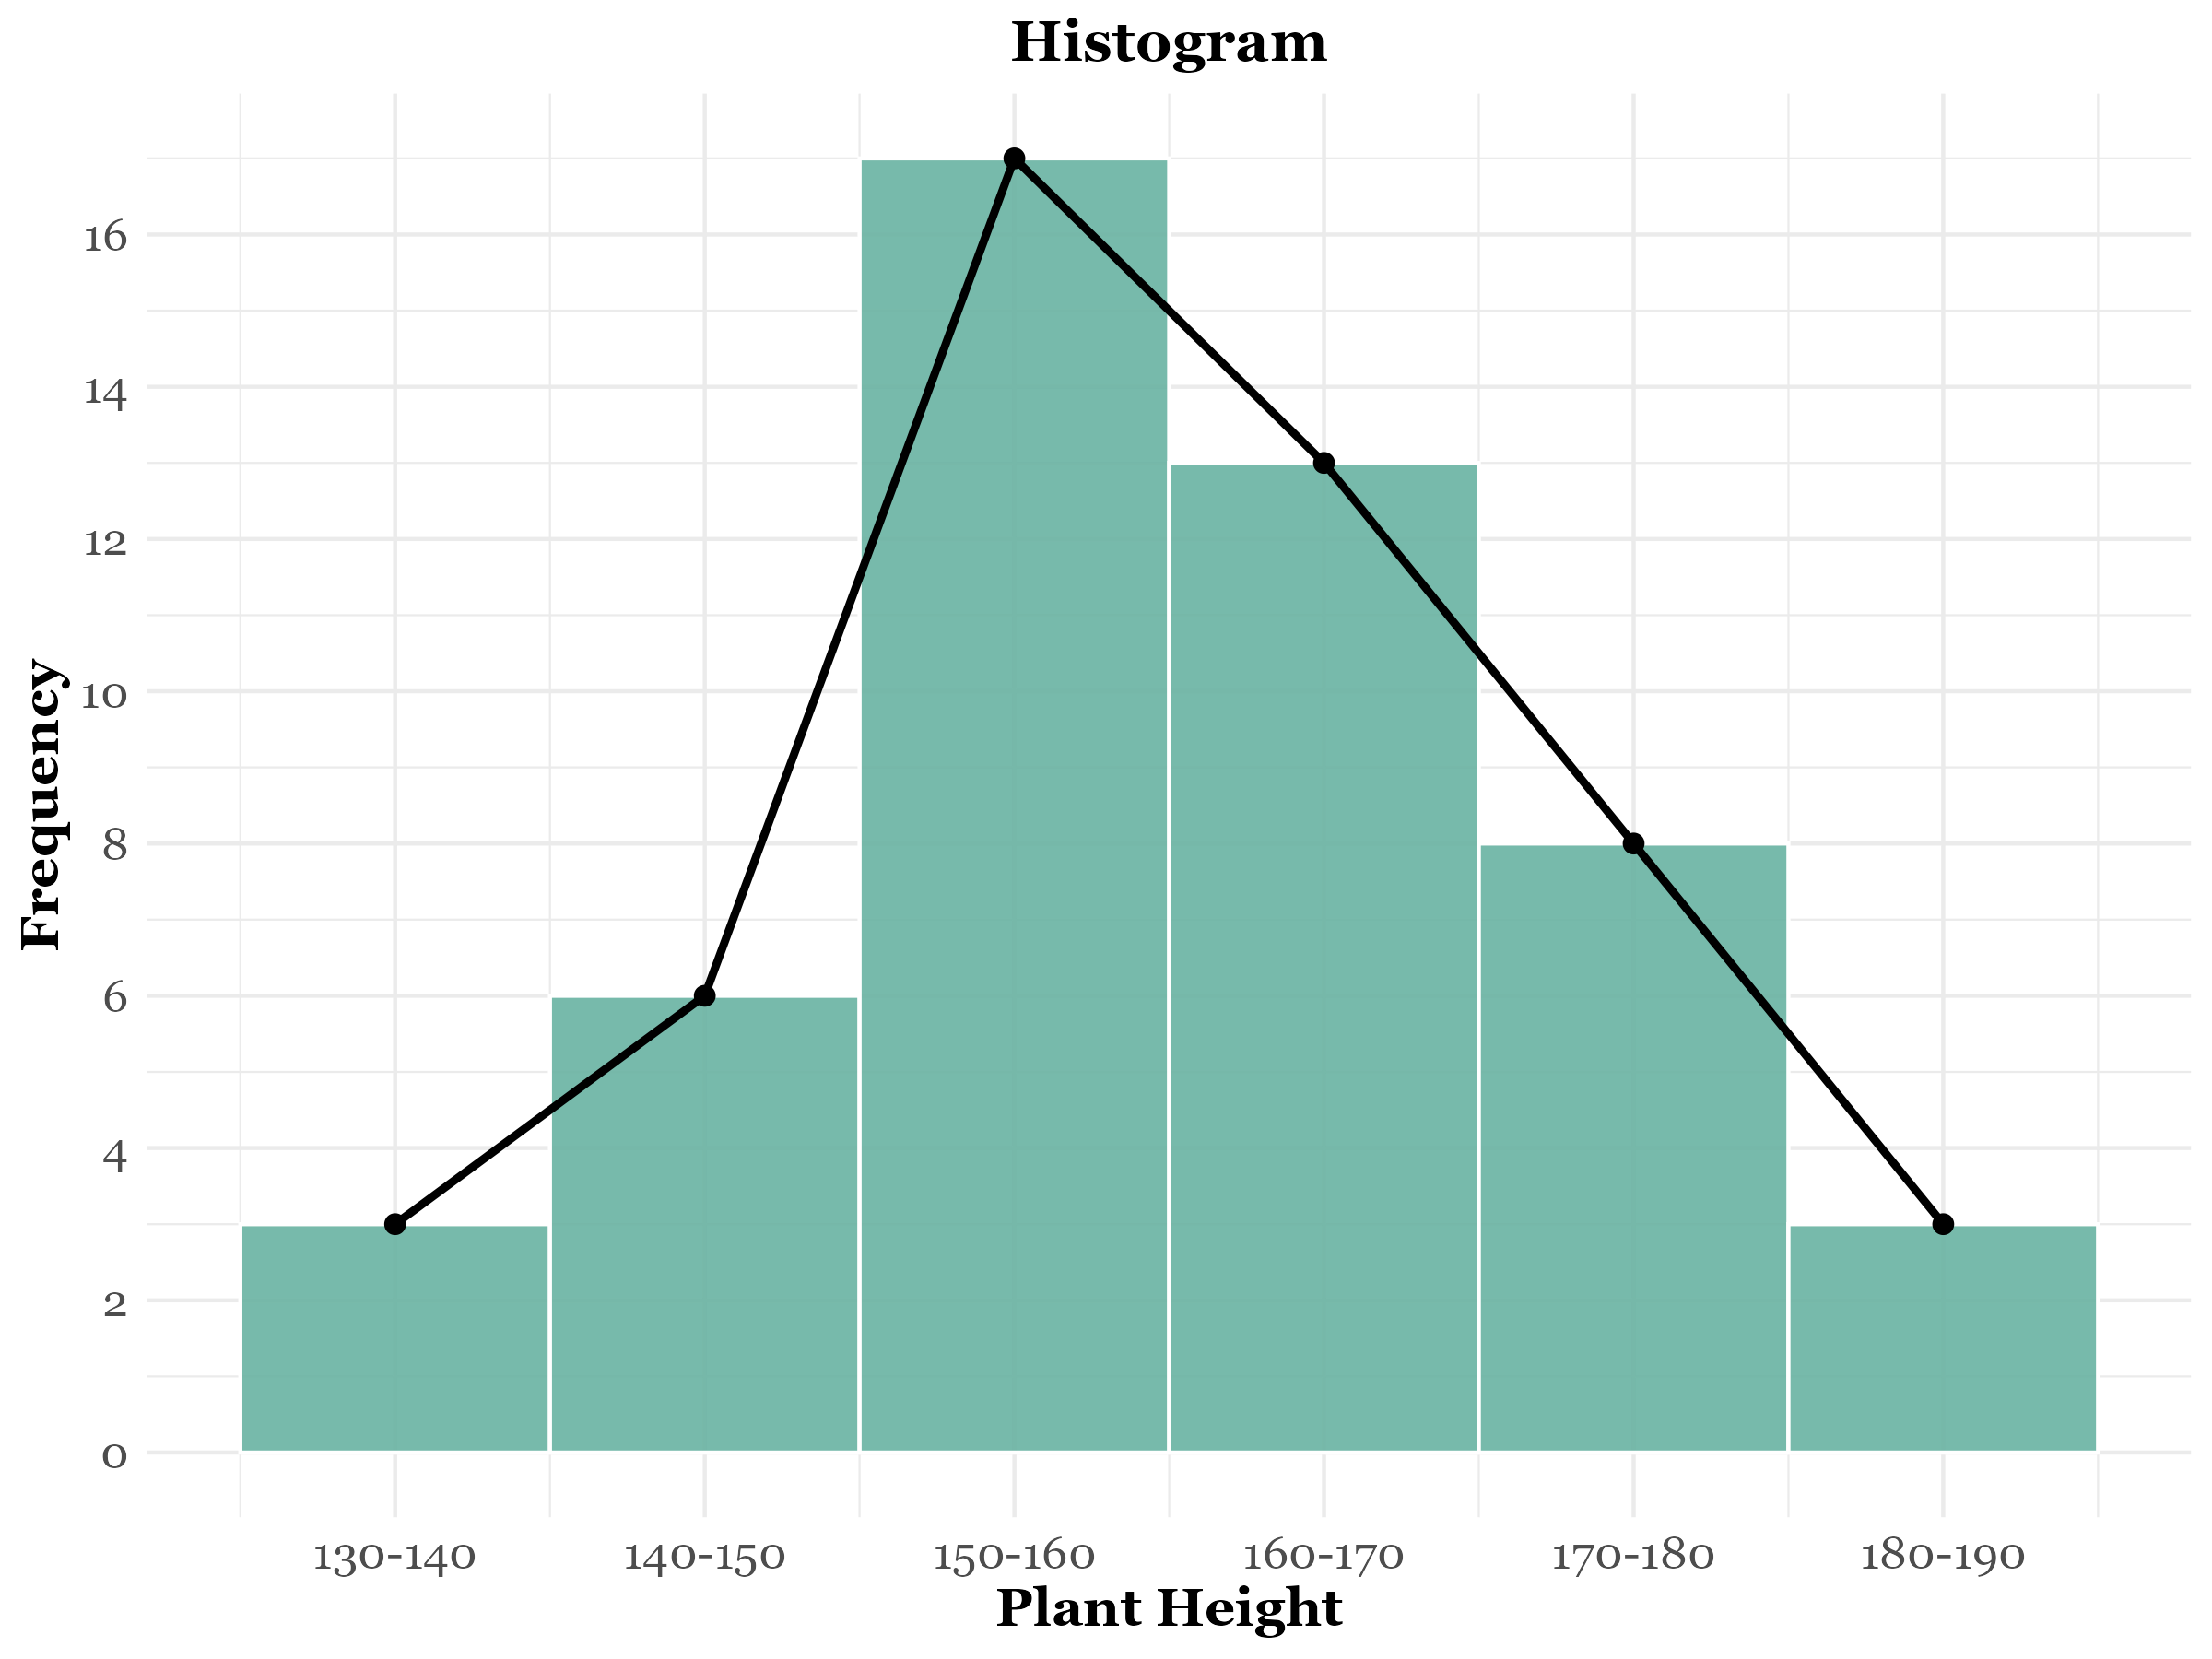
Example 3.1 Table 3.1 displays the frequency distribution of plant heights for a sample of 50 plants. This data can be visualized effectively using a histogram, as shown in Figure 3.1.
| Plant height (cm) | Frequency |
|---|---|
| 130 – 140 | 3 |
| 140 – 150 | 6 |
| 150 – 160 | 17 |
| 160 – 170 | 13 |
| 170 – 180 | 8 |
| 180 – 190 | 3 |
3.2 Ogive
Ogive, also known as the cumulative frequency curve, is a graphical representation that plots cumulative frequencies against class boundaries. The points are typically connected using straight lines, forming a continuous curve. This visualization effectively illustrates the accumulation of frequencies, making it useful for understanding data distribution and determining percentiles or the median.
3.2.1 Types of ogives
There are two main types of cumulative frequency curves:
1. Less than ogive
2. Greater than ogive
Less than ogive
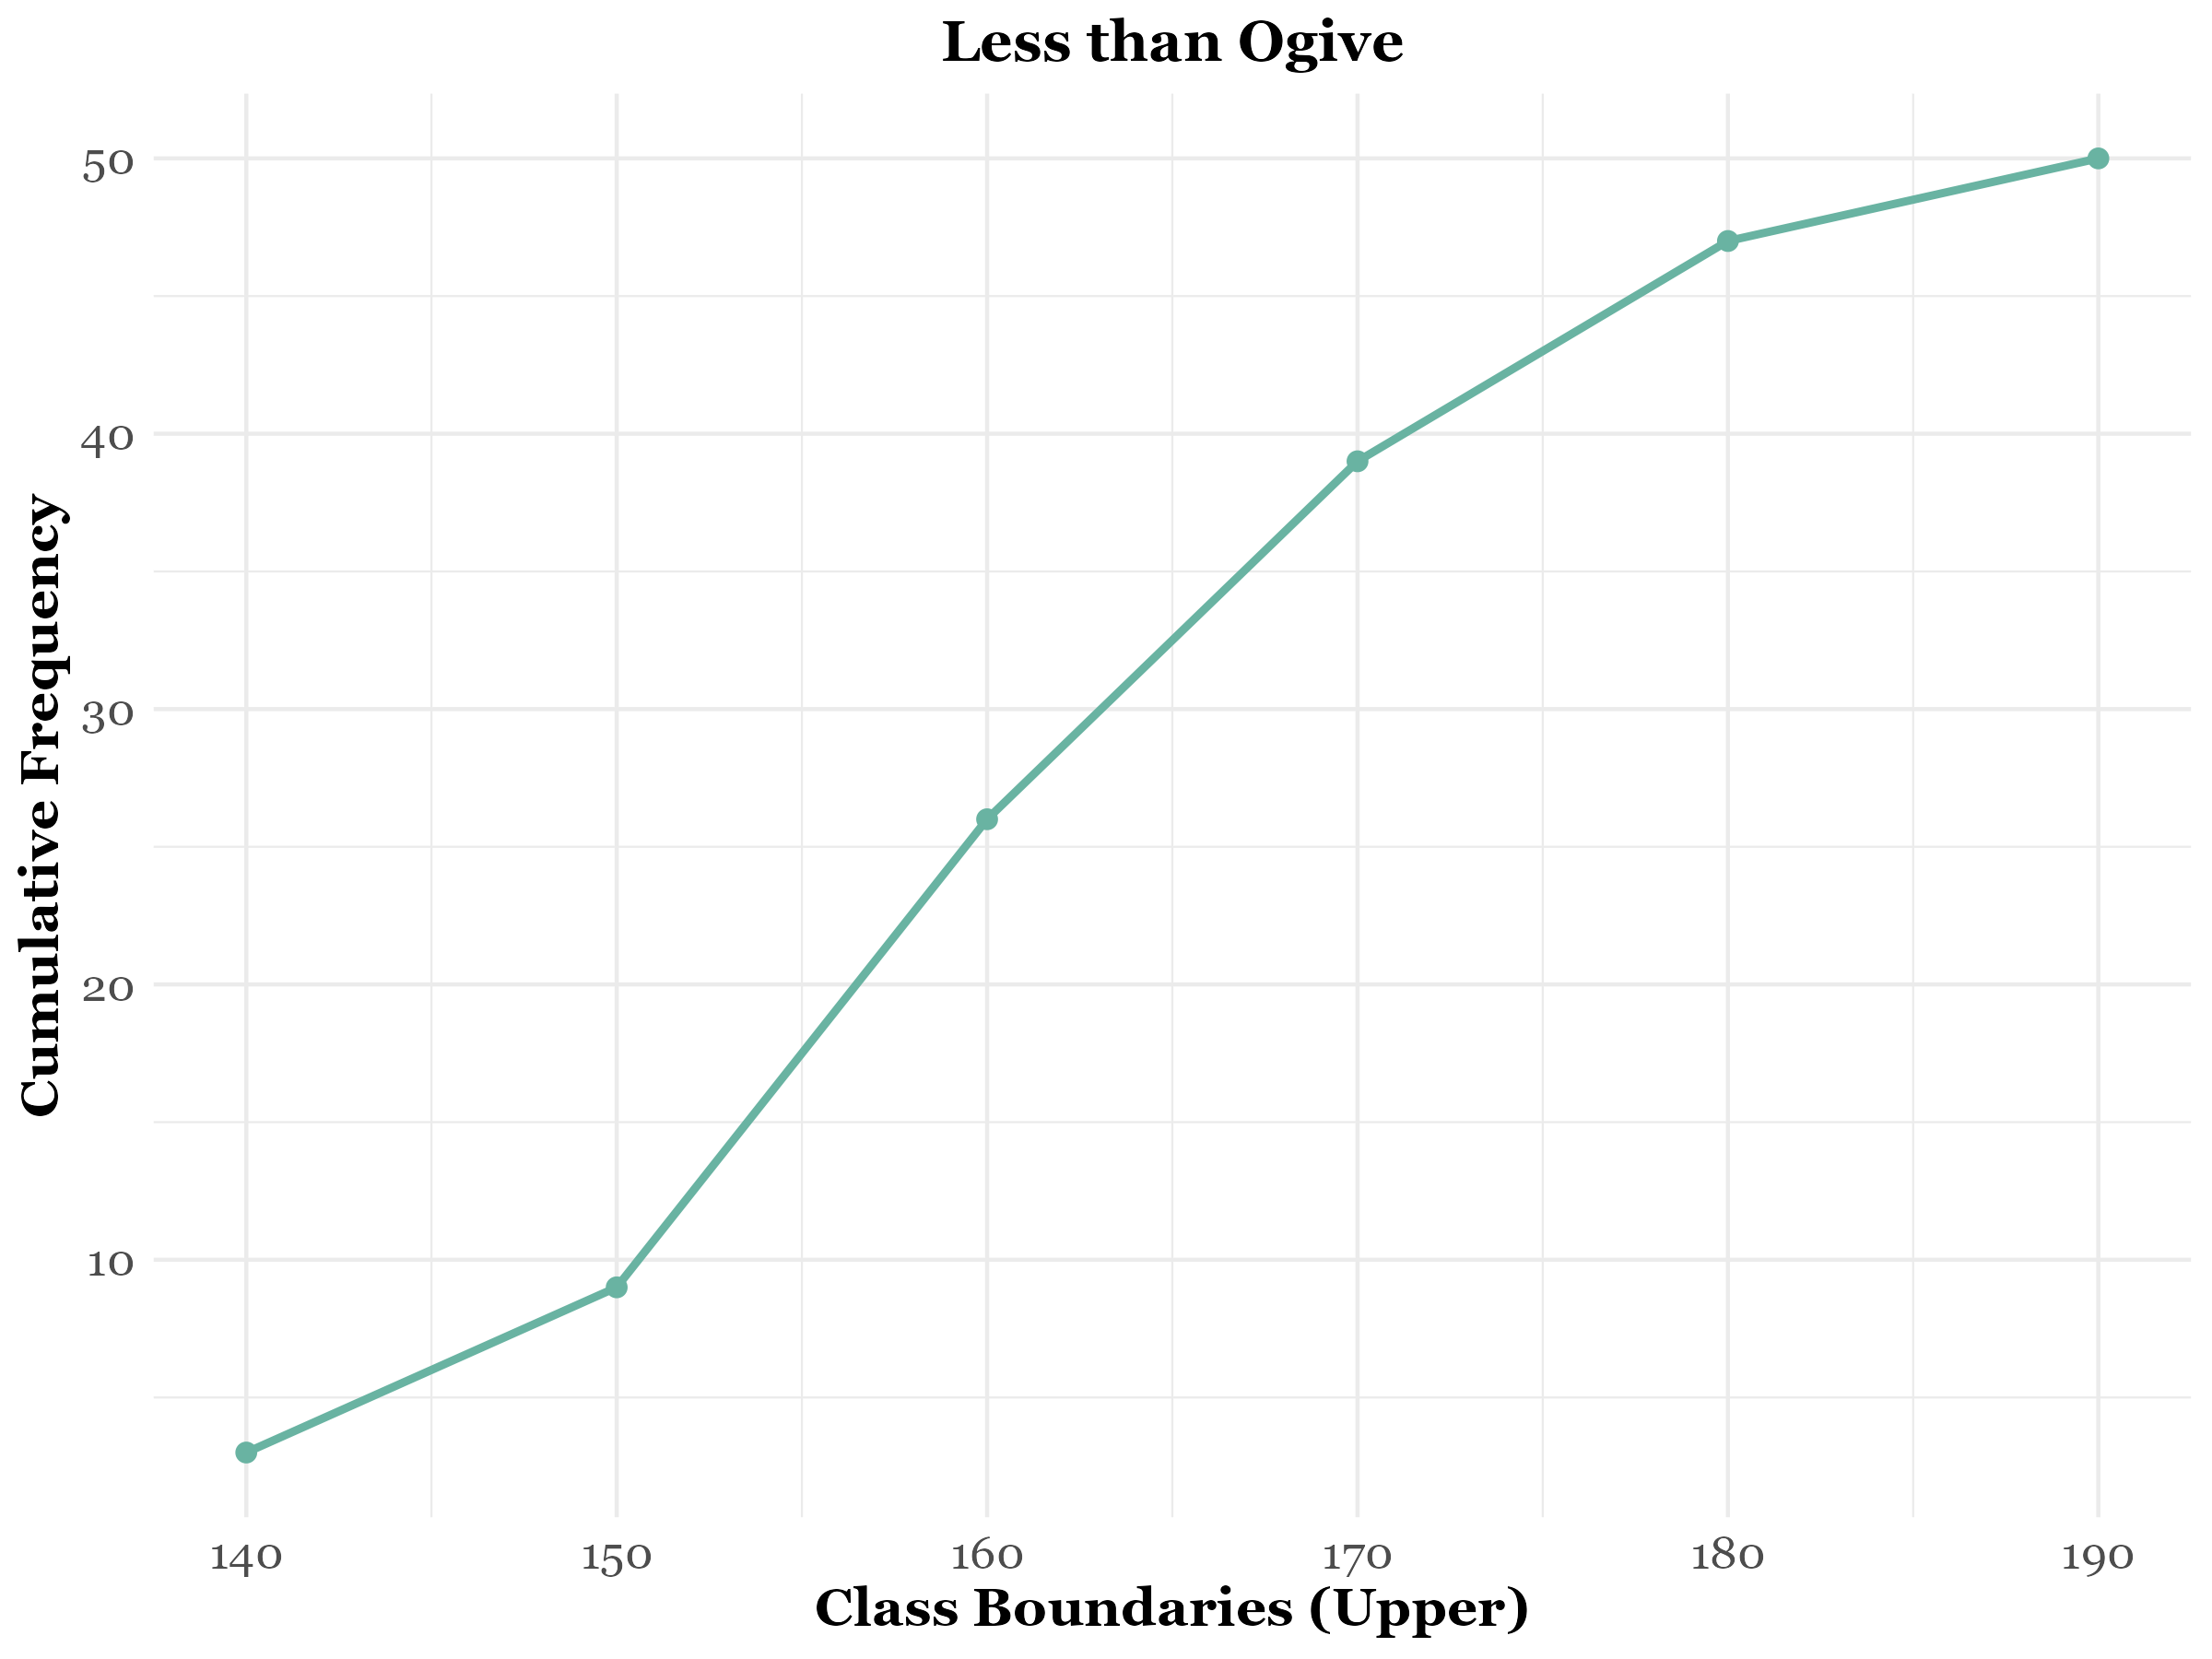
The less than ogive, also known as the less than type cumulative frequency curve, is created by plotting the less than cumulative frequencies against the upper class boundaries. For example, consider the plant height data for 50 plants. By using the upper class limits and their cumulative frequencies, we can construct a smooth curve that provides insights into the data distribution. See Table 3.2, which is constructed from Table 3.1. The less than ogive, shown in Figure 3.2, is drawn using Table 3.2.
| Upper limit | 140 | 150 | 160 | 170 | 180 | 190 |
| LCF | 3 | 9 | 26 | 39 | 47 | 50 |
Note: LCF denotes less than cumulative frequency.
Greater than ogive
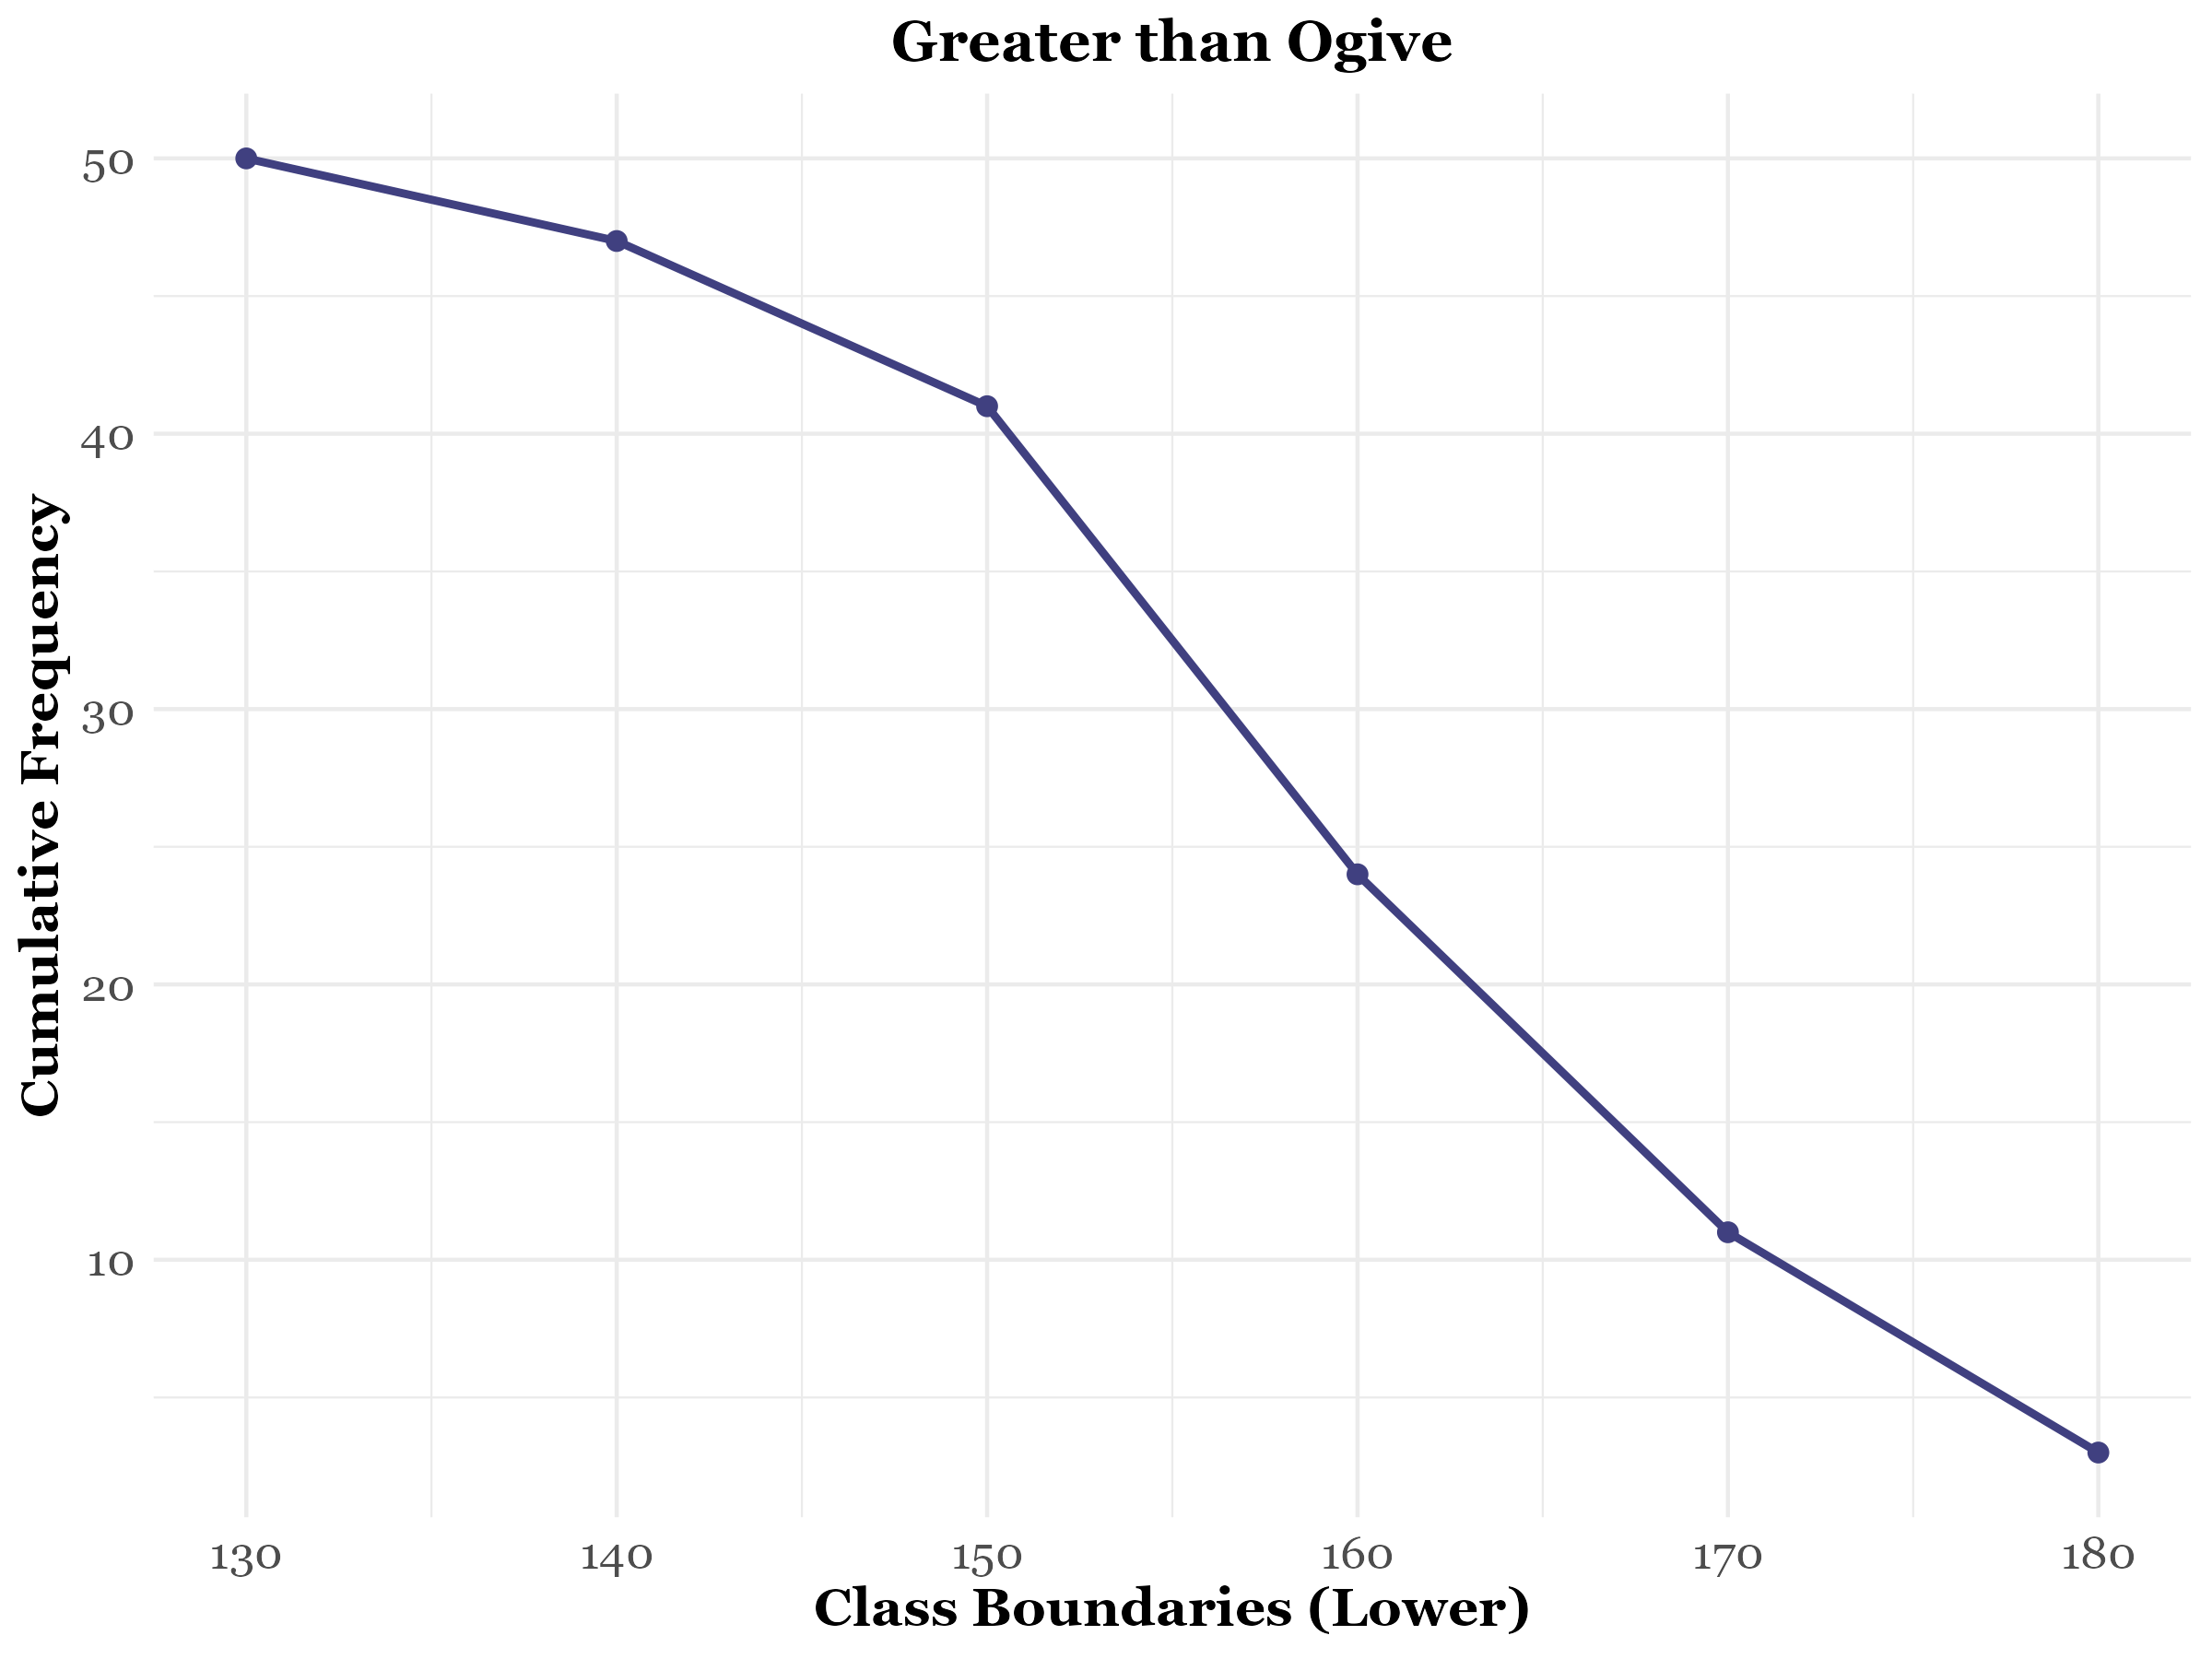
The greater than ogive, also known as the greater than type cumulative frequency curve, is constructed by plotting the greater than cumulative frequencies against the lower class boundaries. In this case, instead of using the upper limits like in the “Less than ogive”, we use the lower class limits and their corresponding cumulative frequencies. This curve helps visualize the cumulative frequency distribution from the highest class down to the lowest, providing insights into the number of observations greater than a specific value. See Table 3.3 constructed from Table 3.1. The greater than ogive, shown in Figure 3.3, is drawn using Table 3.3.
| Lower limit | 130 | 140 | 150 | 160 | 170 | 180 |
| GCF | 50 | 47 | 41 | 24 | 11 | 3 |
Note: GCF denotes greater than cumulative frequency.
Intersection of both less than and greater than ogives gives the median.
3.3 Frequency polygon
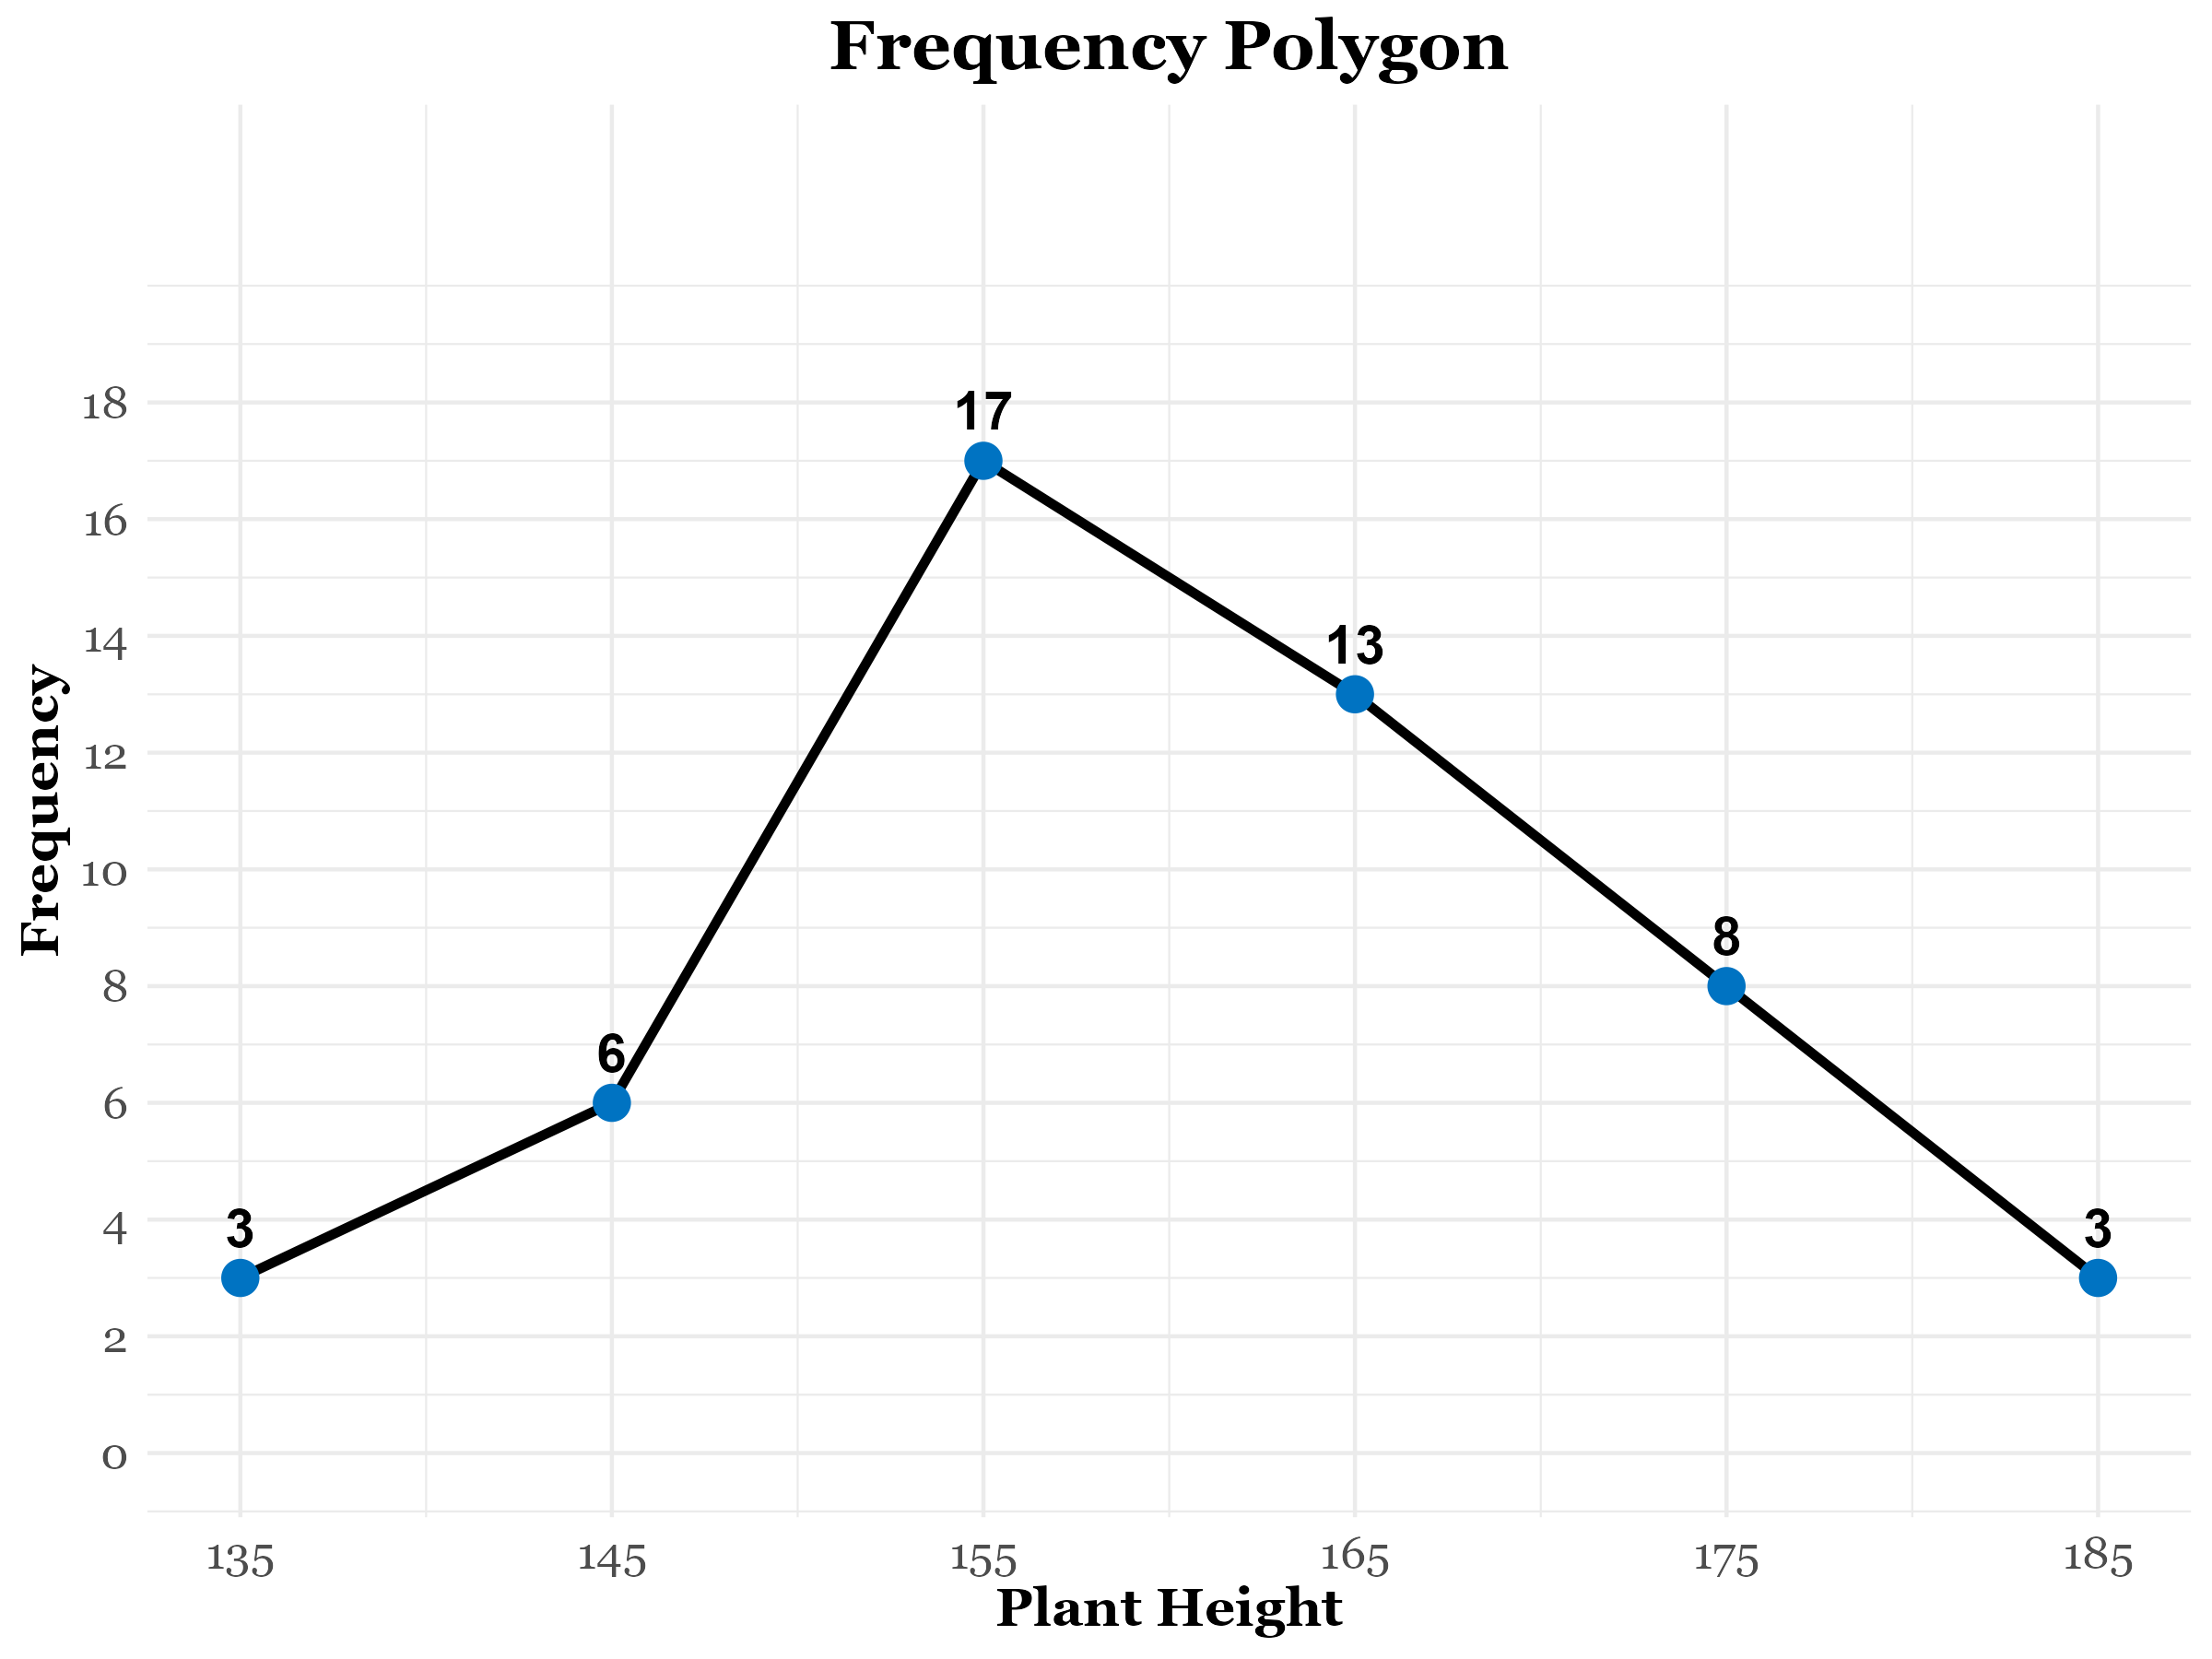
A grouped frequency table can also be represented by a frequency polygon, a special type of line graph. To construct it, plot the class frequencies against the corresponding class midpoints and connect successive points with straight lines. The frequency polygon can also be derived by joining the midpoints of a histogram. See Table 3.4, constructed from Table 3.1. The frequency polygon, created using Table 3.4, is shown in Figure 3.4. The relation between frequency polygon and histogram can be seen in Figure 3.5.
| Class midpoints | 135 | 145 | 155 | 165 | 175 | 185 |
| Frequencies | 3 | 6 | 17 | 13 | 8 | 3 |
3.4 Stem and leaf plot
A stem and leaf plot is a graphical device useful for representing a relatively small set of data that takes numerical values. To construct a stem and leaf plot, we partition each measurement into two parts: the stem (the leading digits) and the leaf (the trailing digits). This method retains the exact value of each observation, unlike a frequency distribution. It also clearly shows the distribution of data within each group. A stem and leaf plot conveys similar information as a histogram, with the added benefit of retaining individual data points. It provides insights into the range, concentration of measurements, and symmetry of the data.
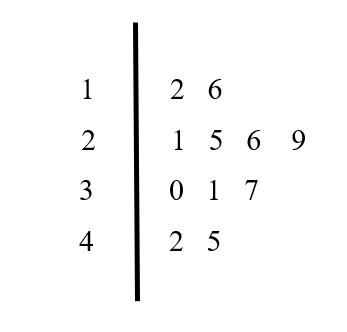
Consider the example:
12, 16, 21, 25, 29, 26, 30, 31, 37, 42, 45.
The stem and leaf plot for this data is shown in Figure 3.6
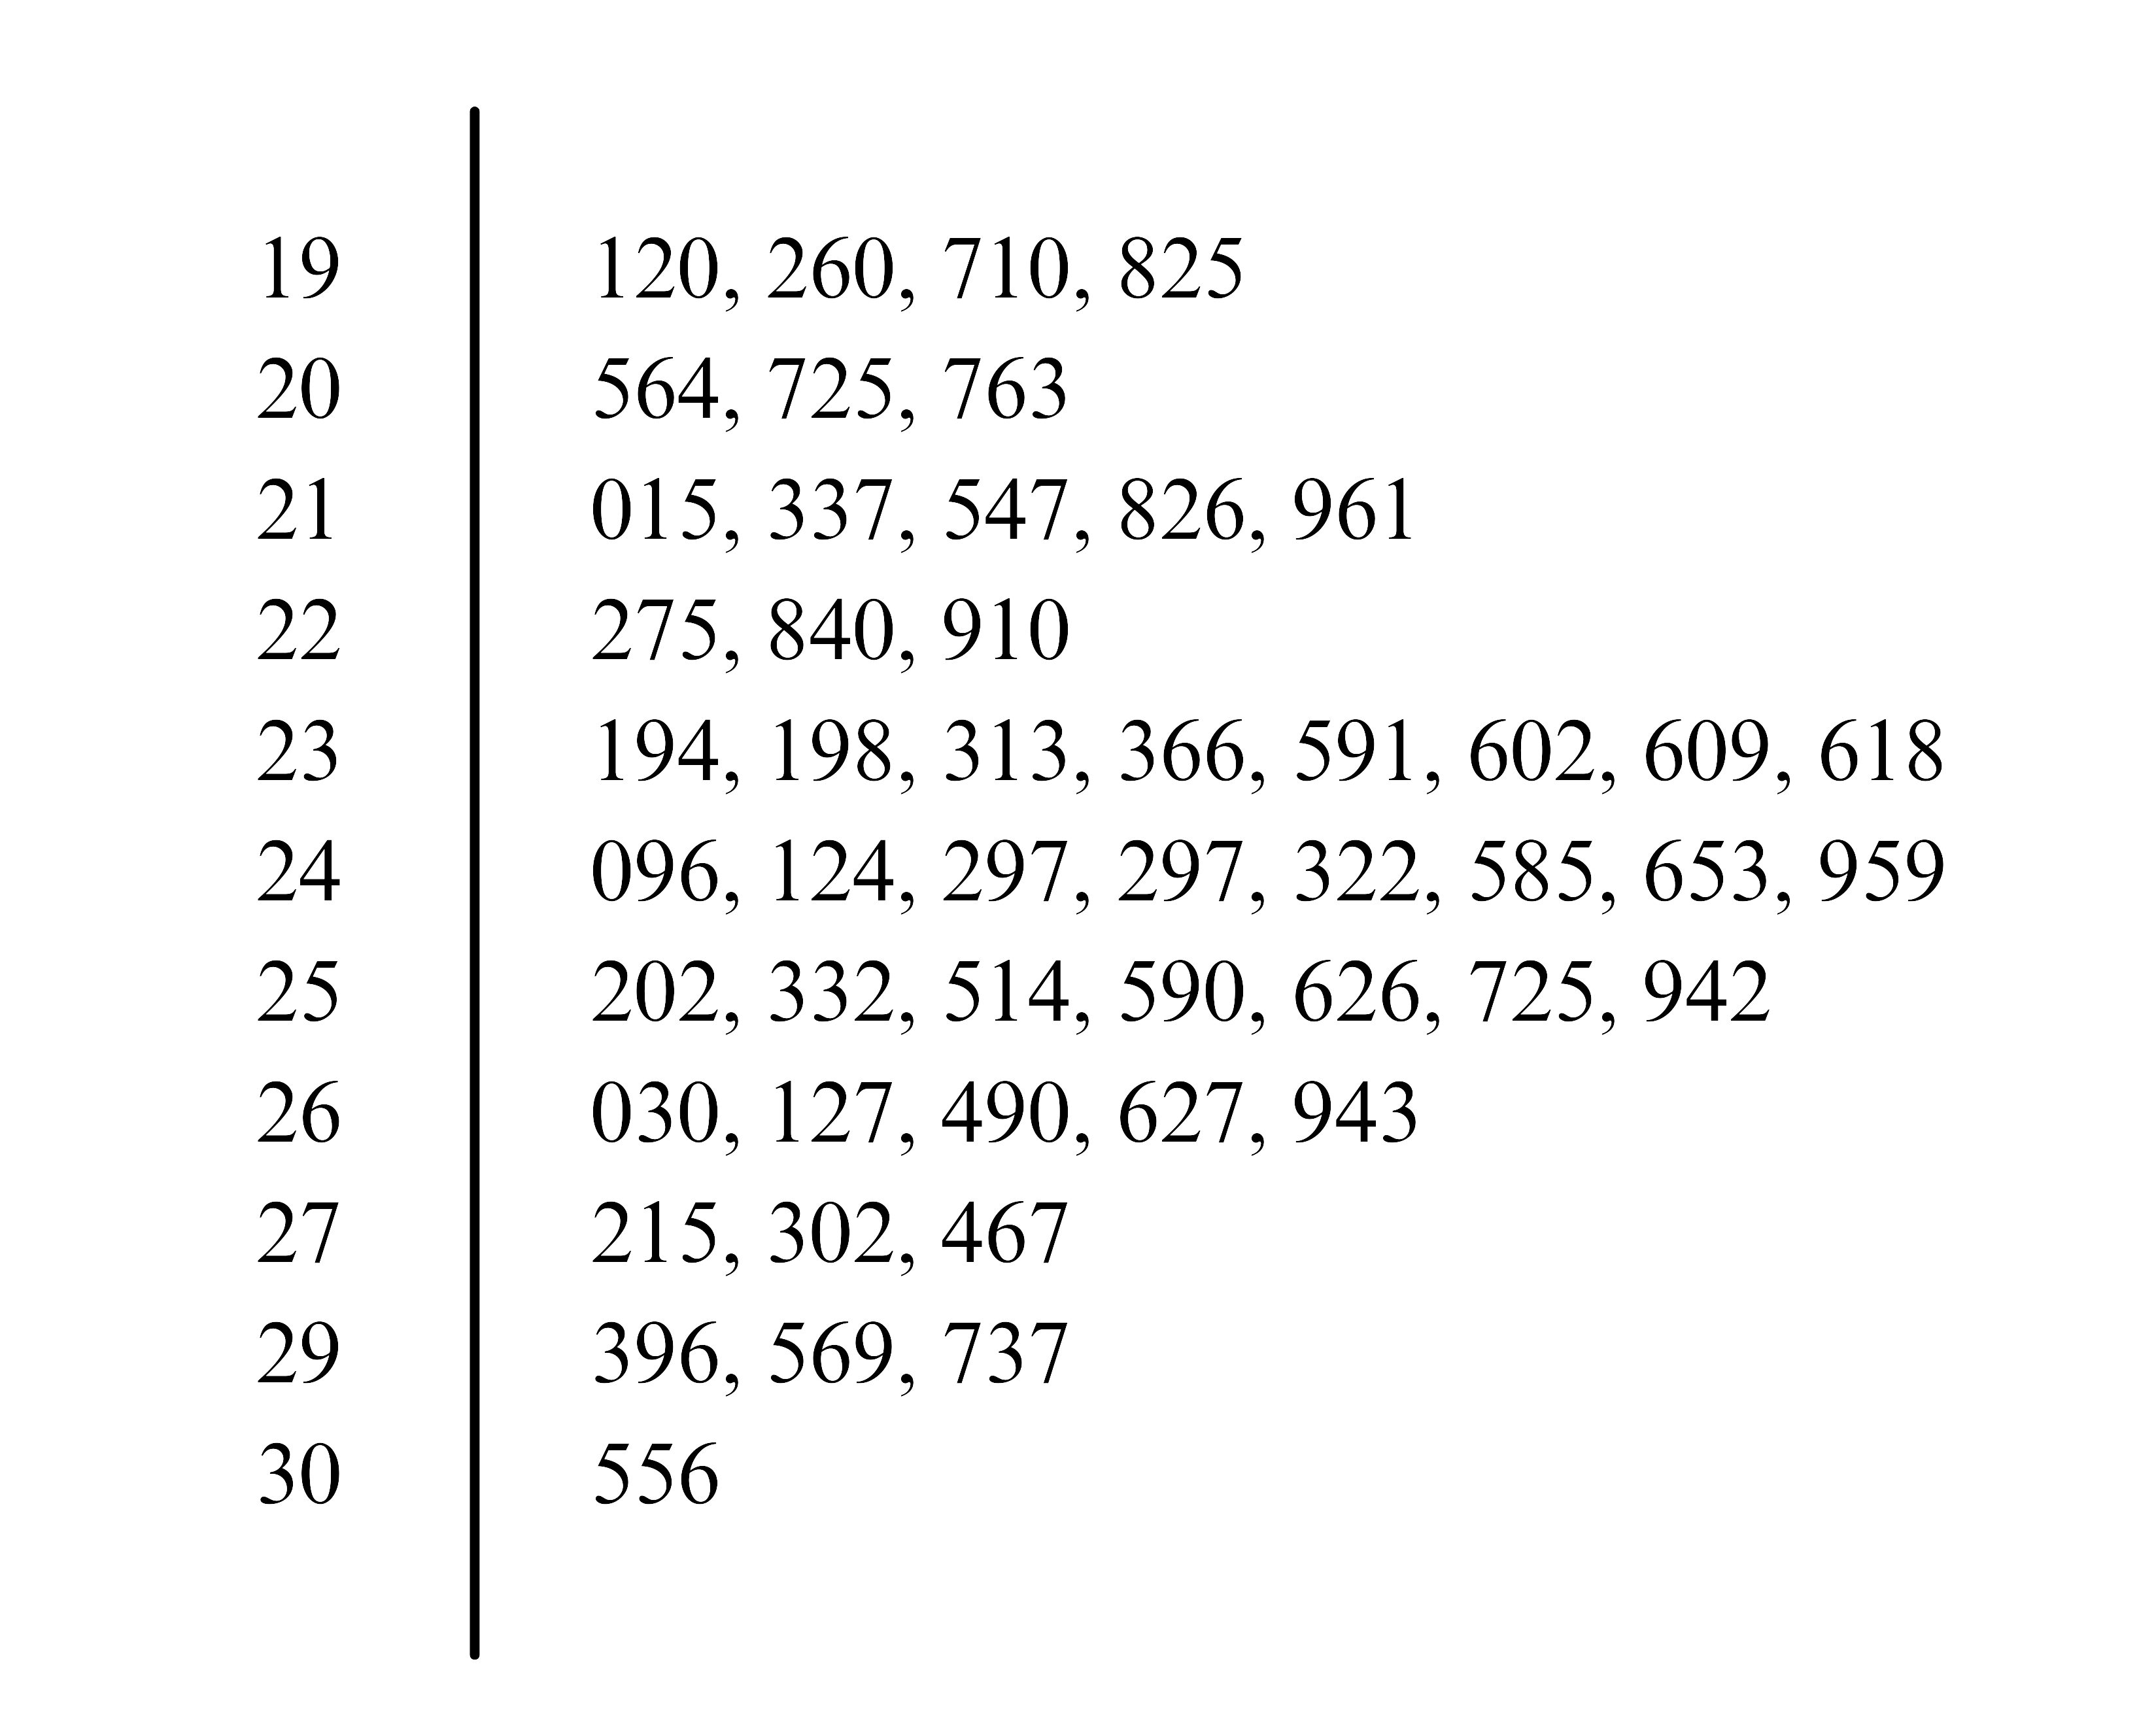
A stem-and-leaf plot is not only useful for small data sets but can also effectively represent larger sets of numerical data. For instance, consider the monthly income of 50 employees in a company:
19710, 24096, 23618, 26490, 25626, 24653, 24297, 23609, 19120, 25942, 23591, 27302, 29569, 25332, 29396, 20725, 25202, 20763, 30556, 21961, 22910, 21826, 21547, 21015, 19825, 24124, 22275, 26127, 24297, 20564, 26943, 26627, 23602, 24585, 25725, 24322, 23198, 25590, 23366, 23313, 22840, 25514, 24959, 23194, 21337, 26030, 27215, 19260, 27467, 29737.
The corresponding stem-and-leaf plot for this data, shown in Figure 3.7, lists the leaves in increasing order under their respective stems. The proper choice of stems is crucial as it organizes the data effectively, revealing patterns and distribution with clarity.
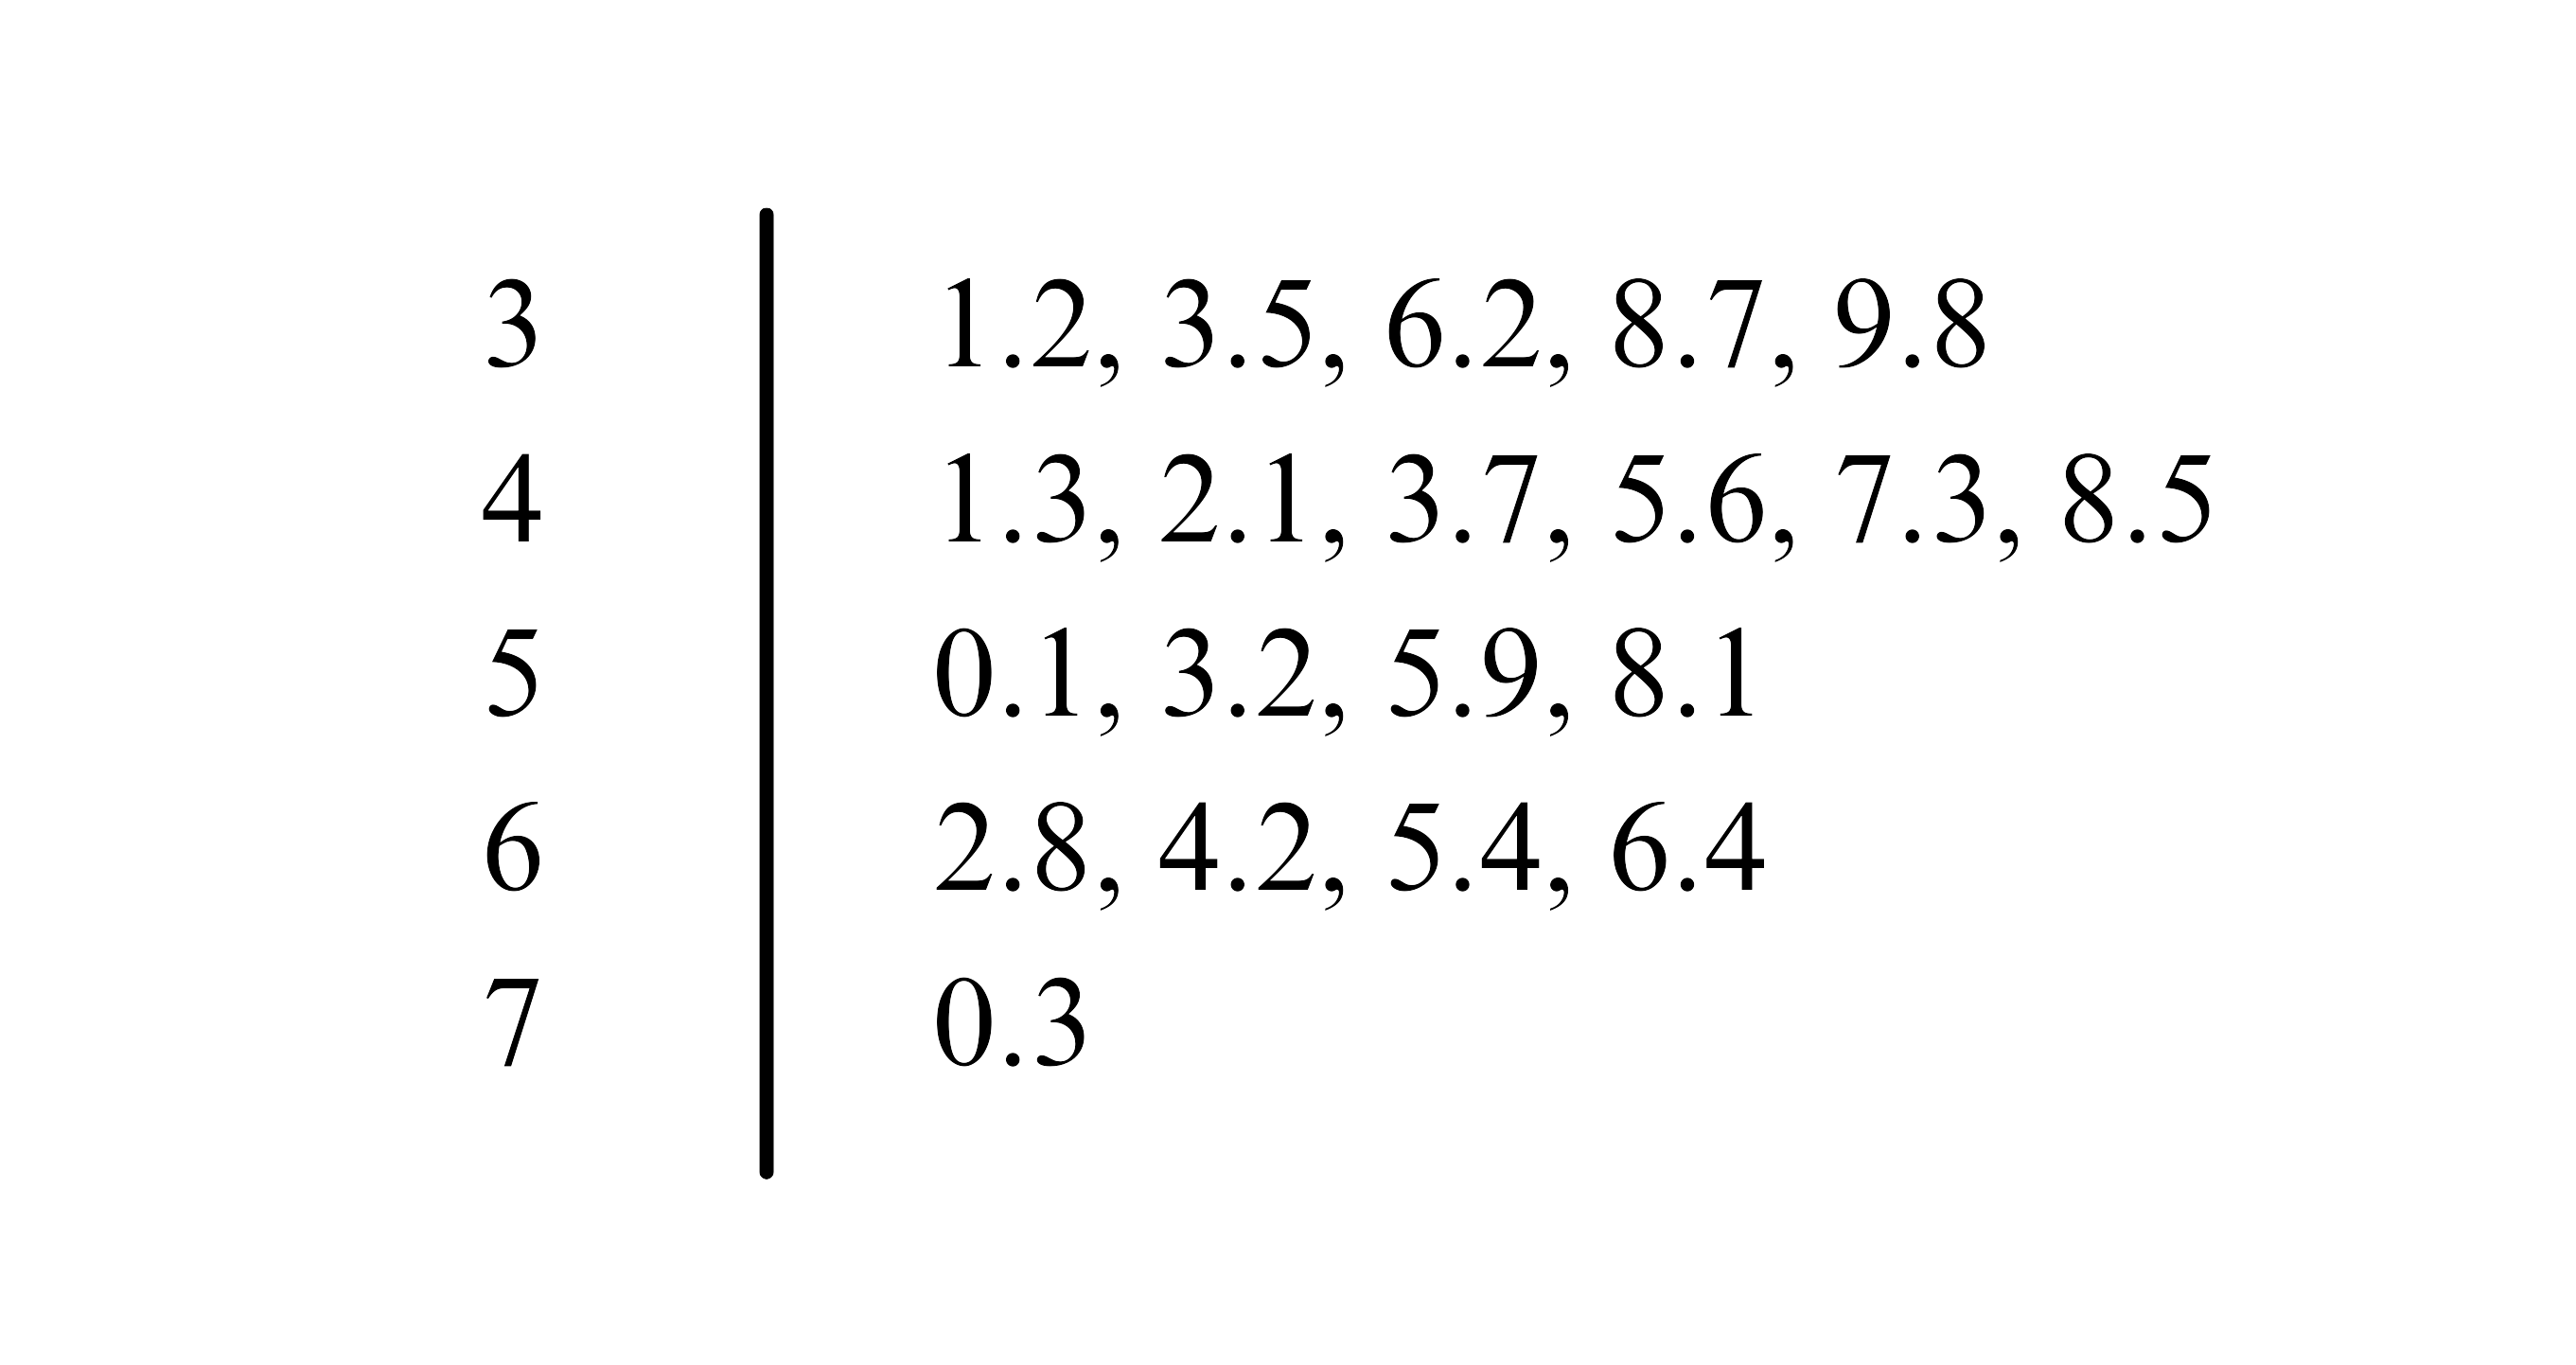
Consider a different dataset representing the percentage of adults with a college degree in 20 cities.
48.5, 53.2, 42.1, 65.4, 70.3, 38.7, 55.9, 47.3, 59.2, 33.5, 45.6, 62.8, 50.1, 41.3, 36.2, 43.7, 39.8, 66.4, 58.1, 31.2.
The stem and leaf plot for this data is shown in Figure 3.8. Here, the tens digit serves as the stem, and the decimal values form the leaves.
3.5 Bar chart
A bar chart or bar graph is a diagram consisting of a series of horizontal or vertical bars of equal width. The bars represent various categories of the data. There are three types of bar charts, and these are simple bar charts, component bar charts and grouped bar charts.
Simple bar chart
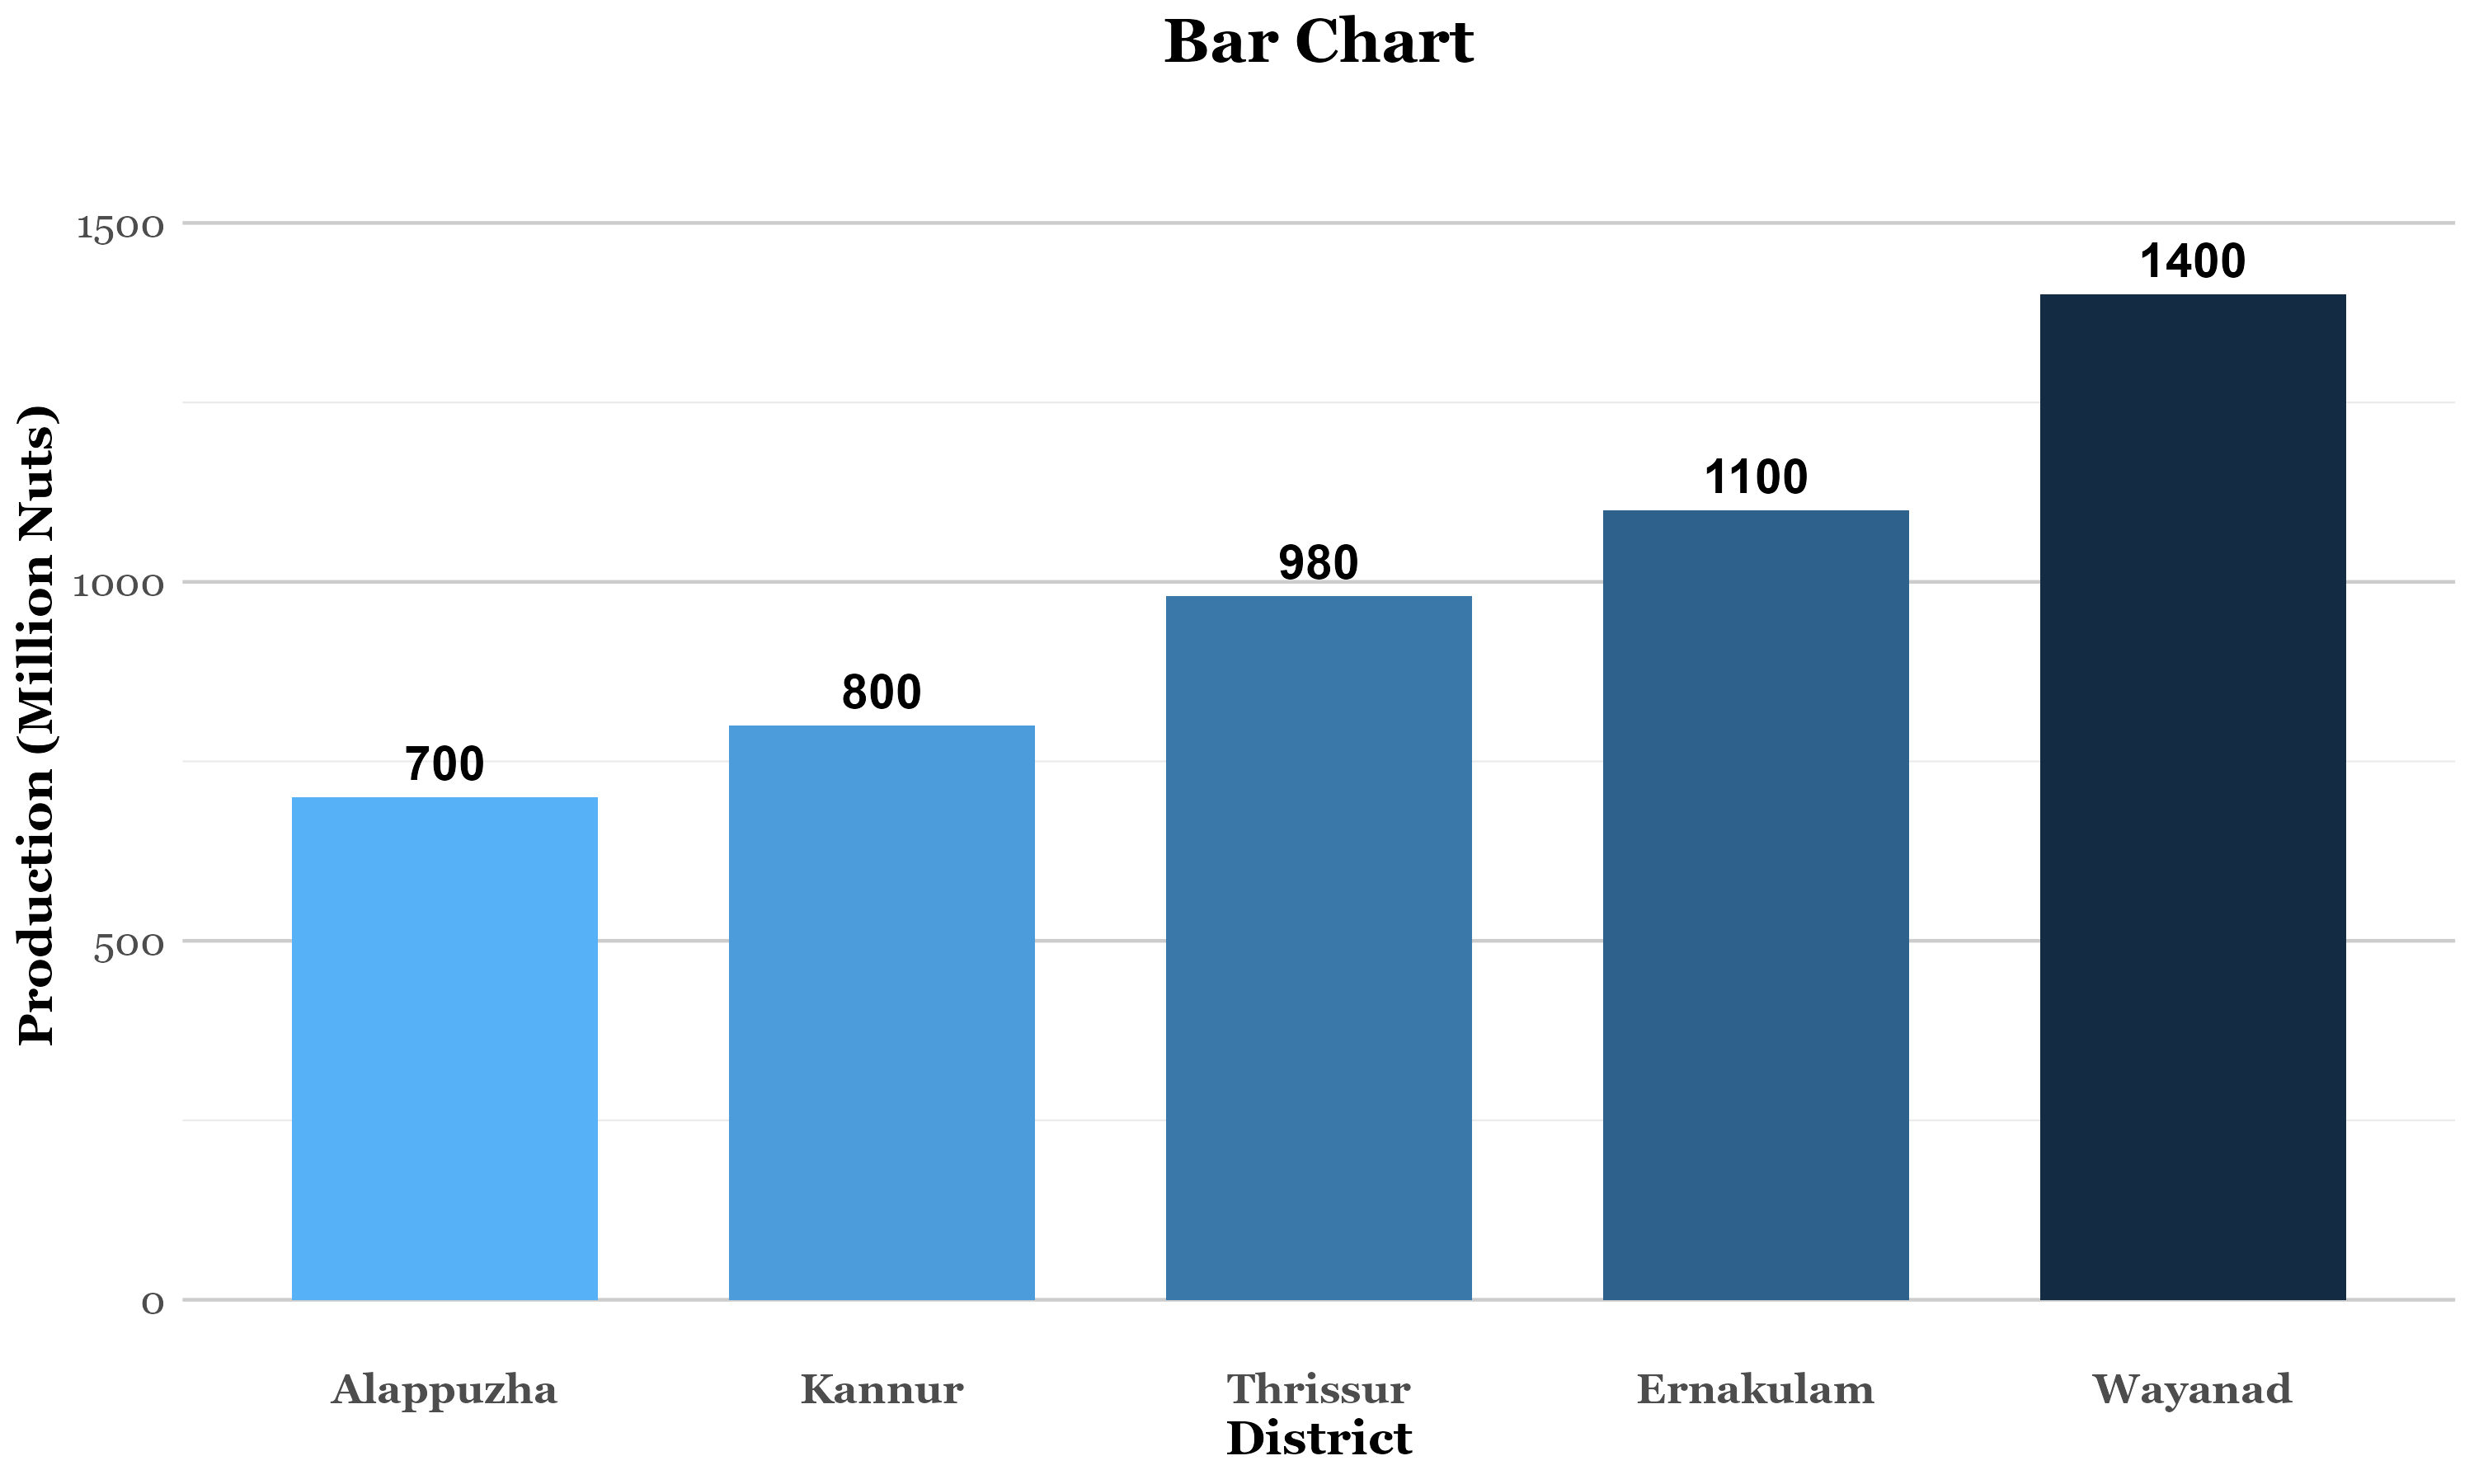
In a simple bar chart, the height (or length) of each bar, plotted on the y-axis, is equal to the value of the category it represents. Table 3.5 presents hypothetical data on coconut production across five districts of Kerala for a specific year. The data represented using barchart is shown in Figure 3.9
| District | Production (million nuts) |
|---|---|
| Alappuzha | 700 |
| Kannur | 800 |
| Thrissur | 980 |
| Ernakulam | 1100 |
| Wayanad | 1400 |
Component bar chart
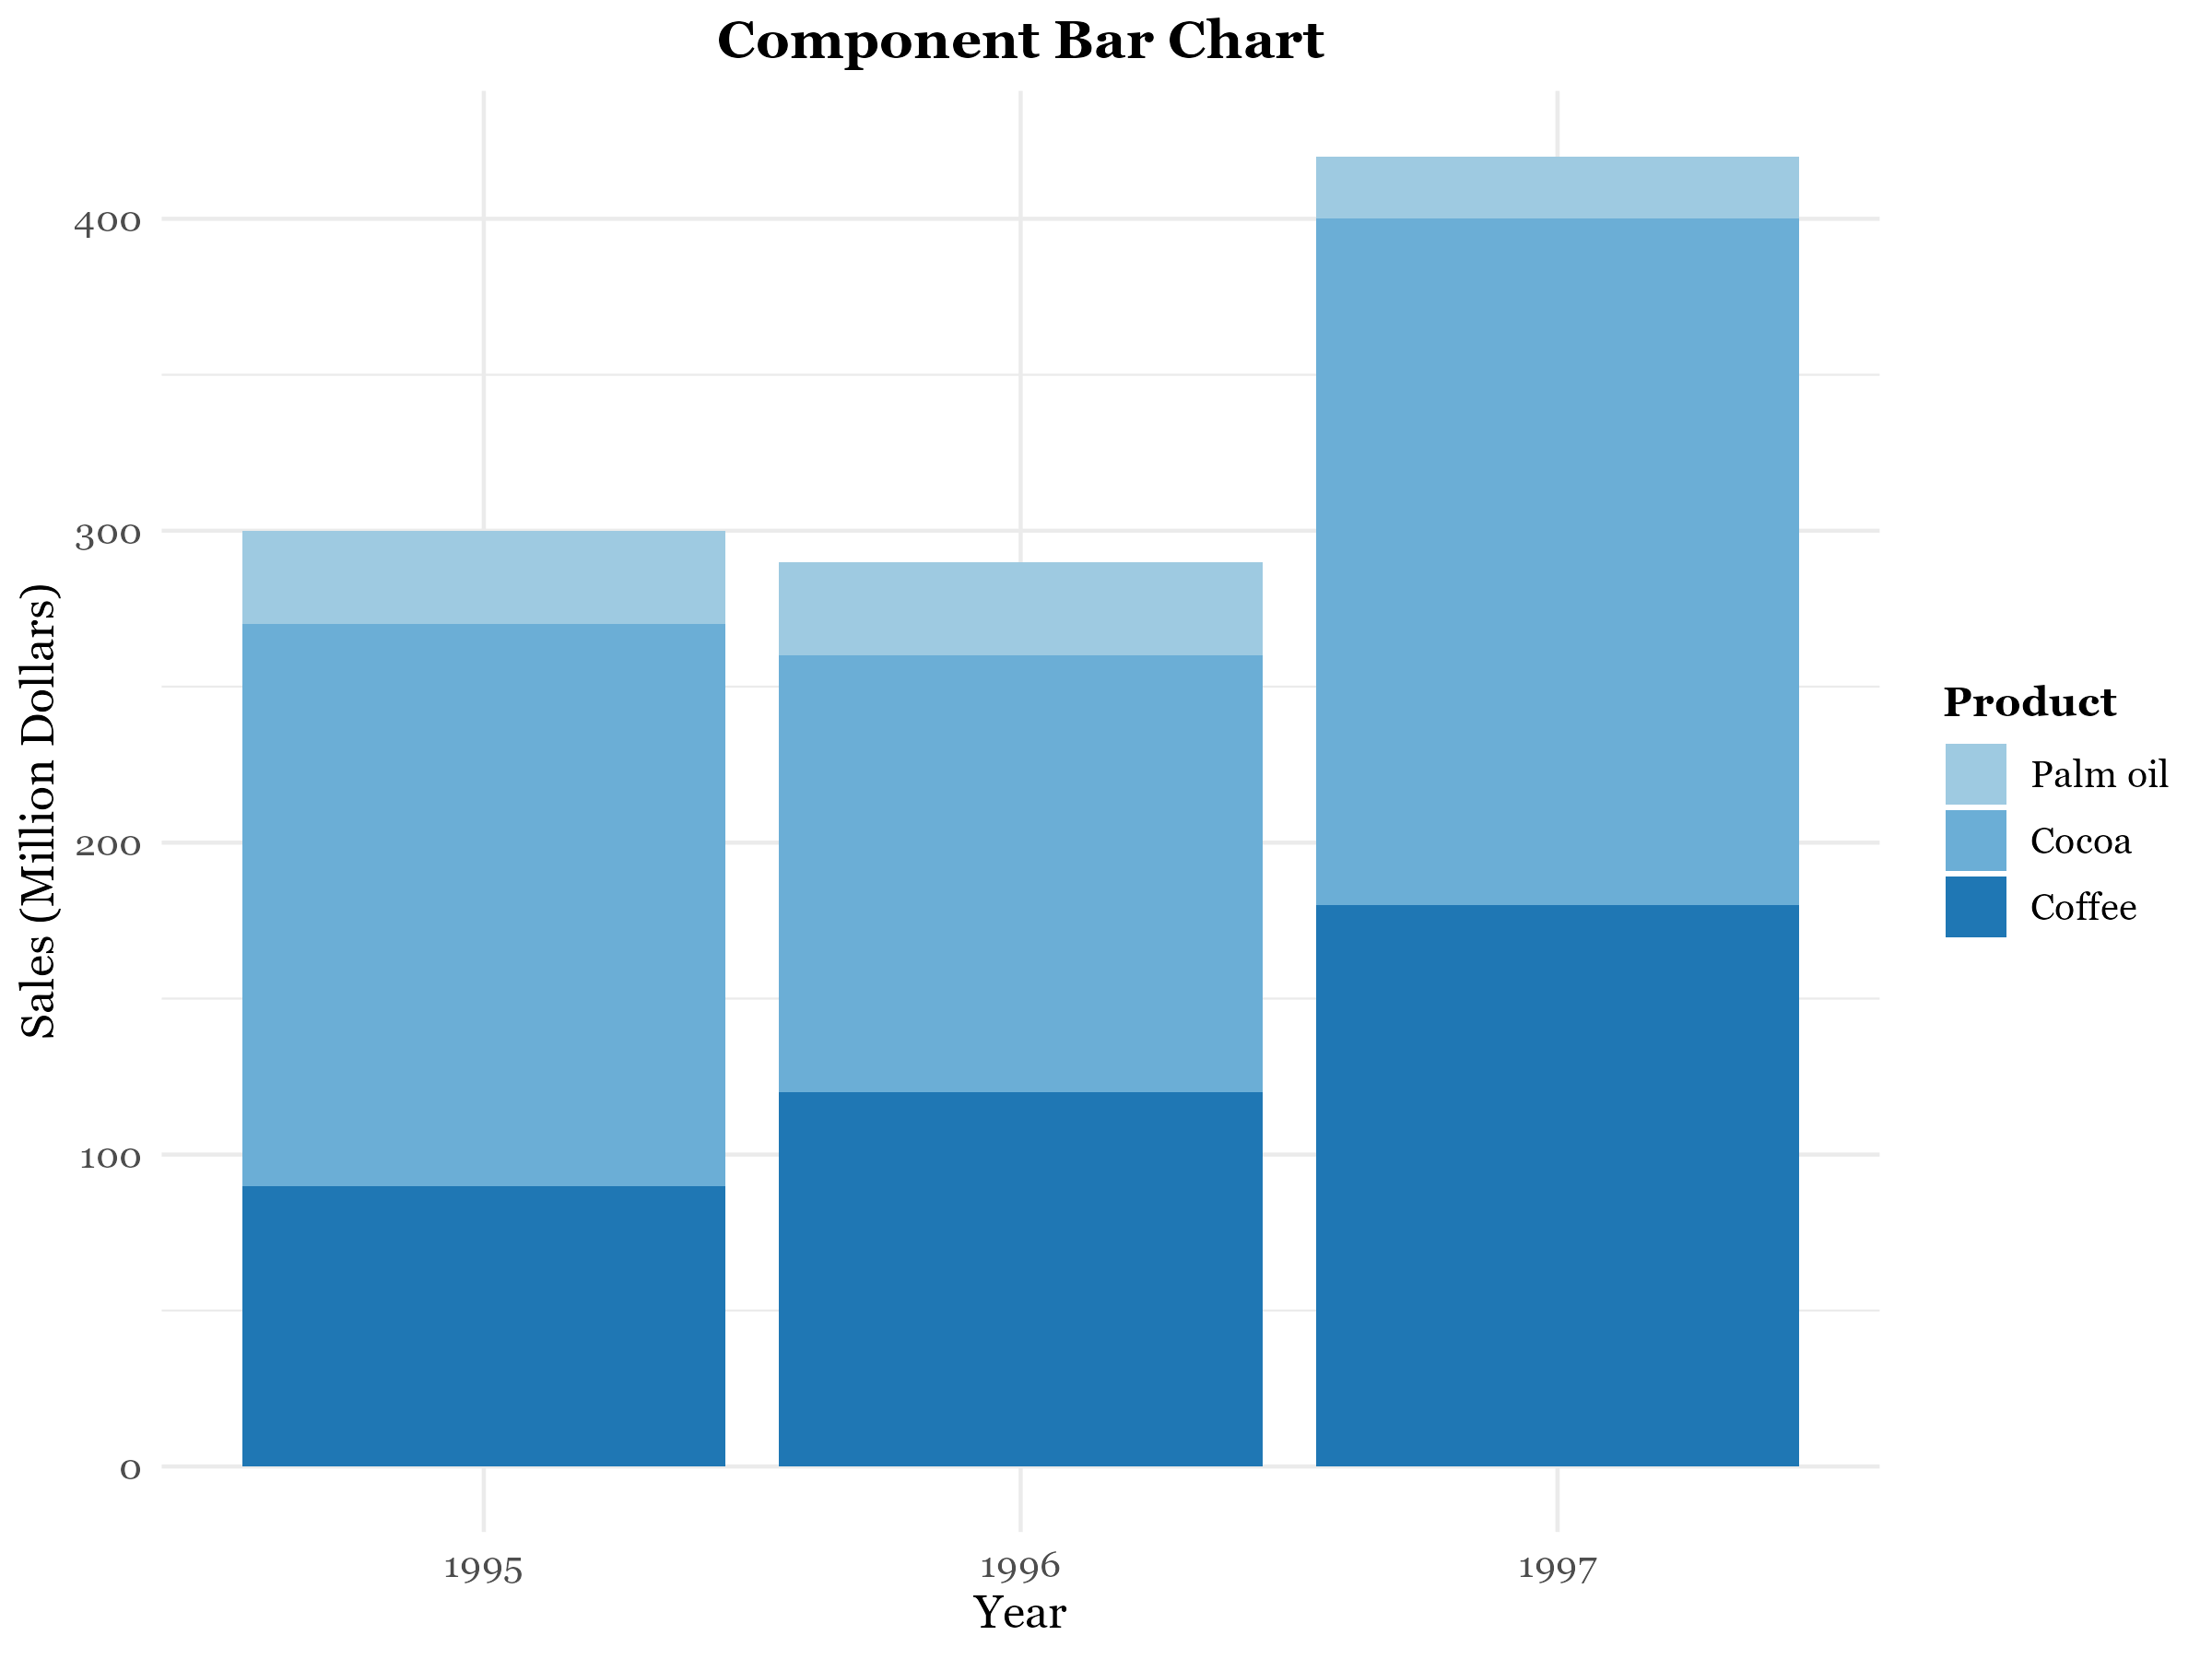
In a component bar chart, the bar for each category is subdivided into component parts; hence its name. Component bar charts are therefore used to show the division of items into components. Component bar chart is also known as stacked barchart.
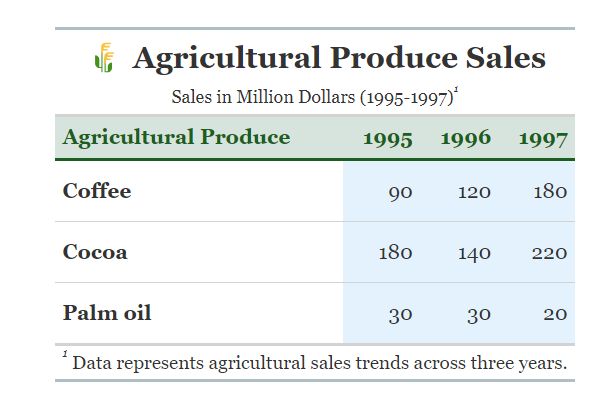
Figure 3.10 shows the distribution of sales of agricultural produce from a farm in 1995, 1996 and 1997 and its corresponding component barchart in Figure 3.11.
The component bar chart shows the changes of each component over the years as well as the comparison of the total sales between different years.
Grouped bar chart
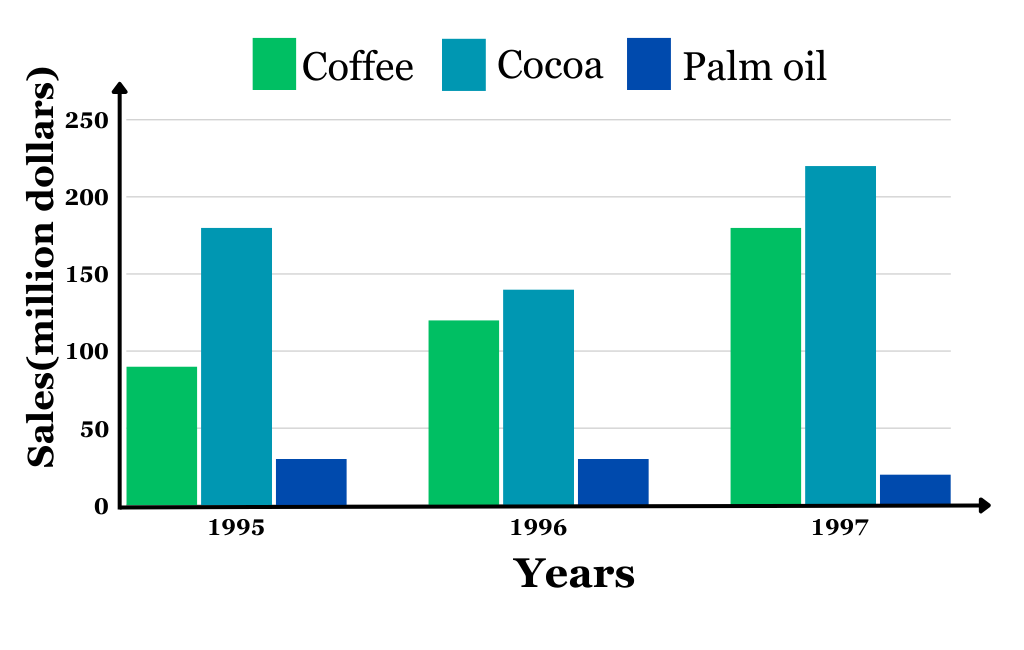
Figure 3.10 can also be represented using a grouped bar chart shown in Figure 3.12. For a grouped bar chart, each category within a group is represented by a bar with a distinct shade or color, allowing for clear comparisons of both within and across groups.
3.6 Histogram versus bar chart
Table 3.6 highlights the key differences between histograms and bar charts, two commonly used graphical tools in data visualization. While both employ bars to represent data, they serve distinct purposes and are applied to different types of data. Understanding these differences ensures the correct choice of graph for effectively presenting and interpreting data.
| Feature | Histogram | Bar chart |
|---|---|---|
| Meaning | A graphical representation using bars to display the frequency of numerical data. | A pictorial representation using bars to compare different categories of data. |
| Purpose | Depicts the distribution of continuous (non-discrete) data. | Compares discrete (categorical) data. |
| Type of data | Quantitative data. | Categorical data. |
| Bar spacing | Bars are adjacent with no gaps. | Bars are separated by spaces. |
| Grouping of elements | Data is grouped into ranges or intervals (bins). | Data is represented as individual categories. |
| Bar order | Bars cannot be reordered. | Bars can be reordered. |
| Bar width | Bar widths may vary. | Bar widths are uniform. |
3.7 Pie chart
A pie chart is a circular graph divided into sectors, each sector representing a different value or category. The angle of each sector of a pie chart is proportional to the value of the part of the data it represents. The bar chart is more precise than the pie chart for visual comparison of categories with similar relative frequencies.
Steps for constructing a pie chart
- Find the sum of the category values.
- Calculate the angle of the sector for each category, using the following formula. Angle of the sector for category A = \(\frac{\text{value of category A}}{\text{sum of category values}} \times 360\)
- Construct a circle and mark the center.
- Use a protractor to divide the circle into sectors, using the angles obtained in step 2.
- Label each sector clearly.
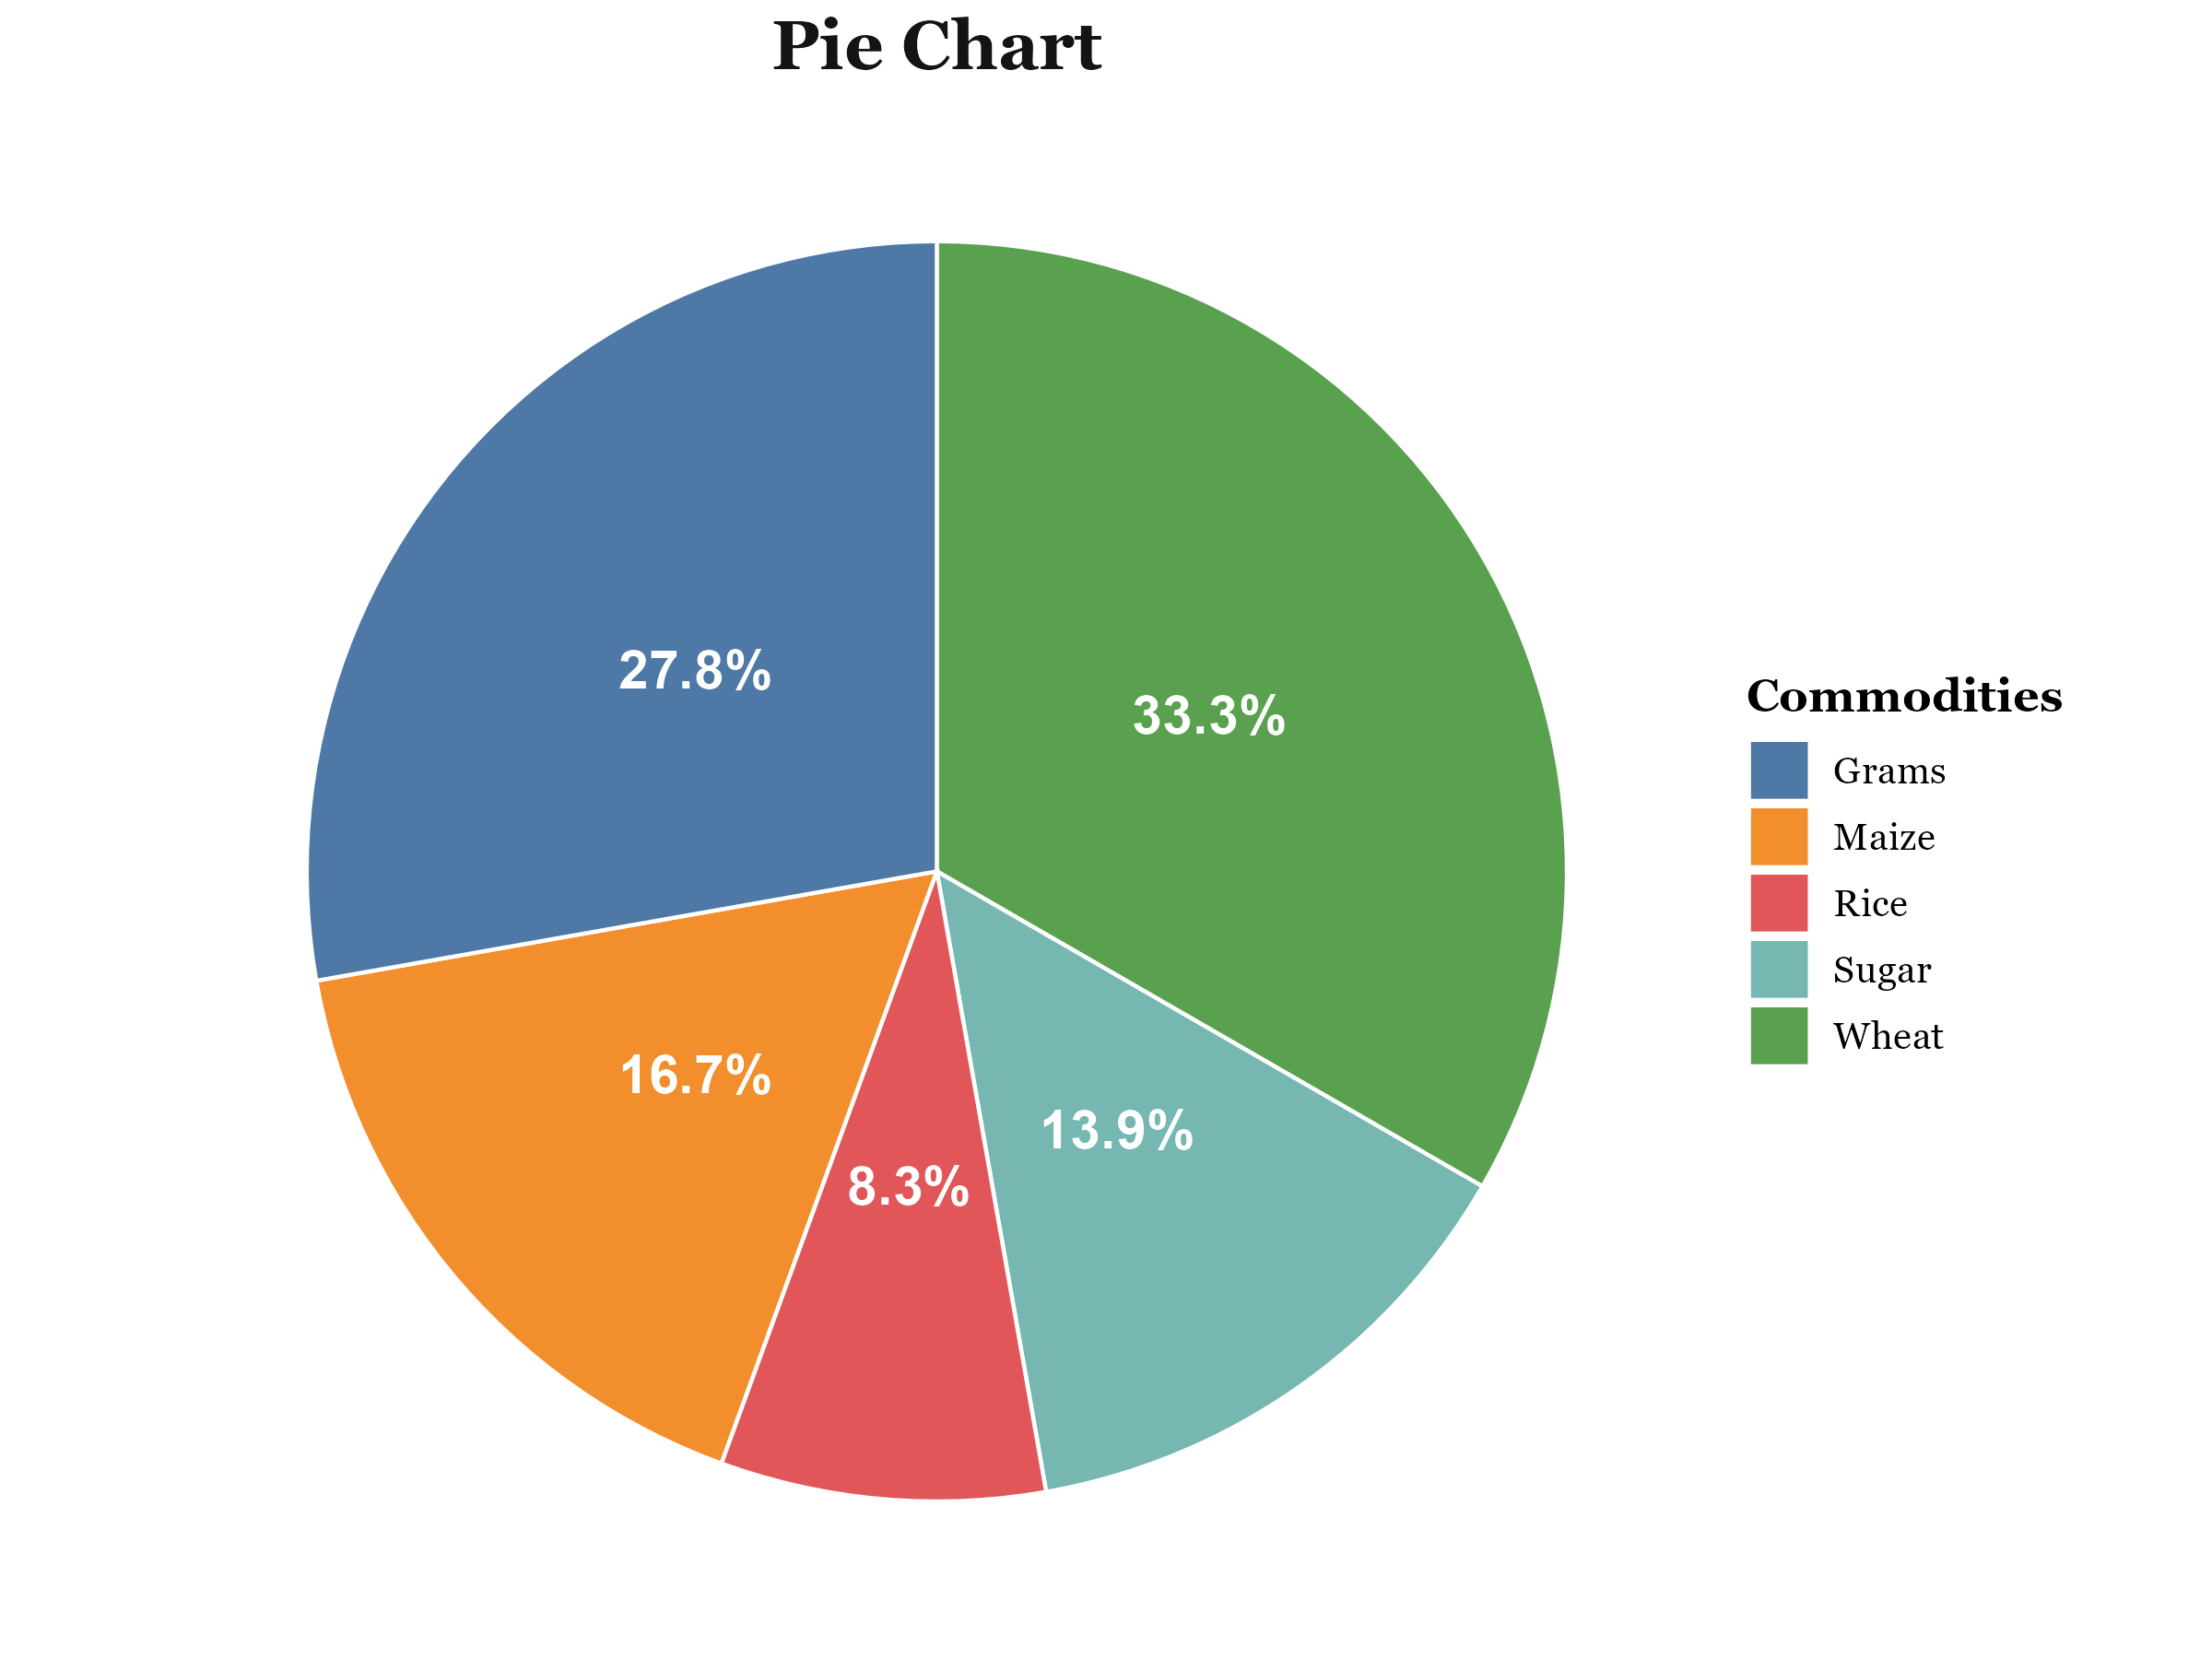
Table 3.7 presents hypothetical data on the production of different commodities in India during a particular year. The pie chart based on this data is shown in Figure 3.13.
| Commodities | Production(tonnes) | Angle |
|---|---|---|
| Wheat | 27000 | (27000/81000)×360 = 120 |
| Gram | 22500 | 100 |
| Maize | 13500 | 60 |
| Rice | 6750 | 30 |
| Sugar | 11250 | 50 |
| Total | 81000 | 360 |
3.8 Boxplot
A boxplot, also known as a box-and-whisker plot, visually represents the five-number summary of a dataset: the minimum value, first quartile, median, third quartile, and maximum value. These key statistics provide insights into the dataset’s central tendency, spread, and potential outliers. Quartiles and the median, explained in detail in Section 5.5, are critical components of this summary.
In a boxplot, a rectangular box spans from the first quartile (Q1) to the third quartile (Q3), with a vertical line inside the box indicating the median. Whiskers extend from each end of the box towards the dataset’s minimum and maximum values, providing a clear picture of the range and variability.
Figure 3.14 below shows the parts of a box plot.
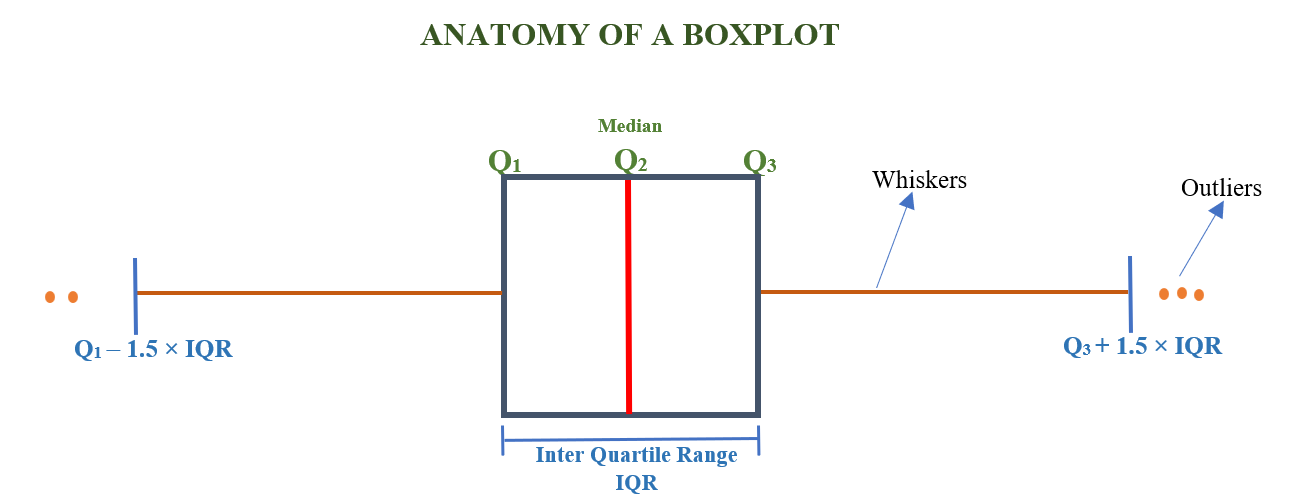
The whiskers do not necessarily extend to the true minimum and maximum of the dataset. Instead, they extend to the most extreme data points that lie within 1.5 × IQR of the box, where the lower whisker limit is \(Q_{1}- 1.5\times IQR\) and the upper whisker limit is \(Q_{3}+ 1.5\times IQR\); here, \(Q_{1}\) and \(Q_{3}\) represent the first and third quartiles, and IQR stands for the interquartile range. Any data points falling beyond these limits are plotted individually and considered outliers.
3.9 Advanced visualization
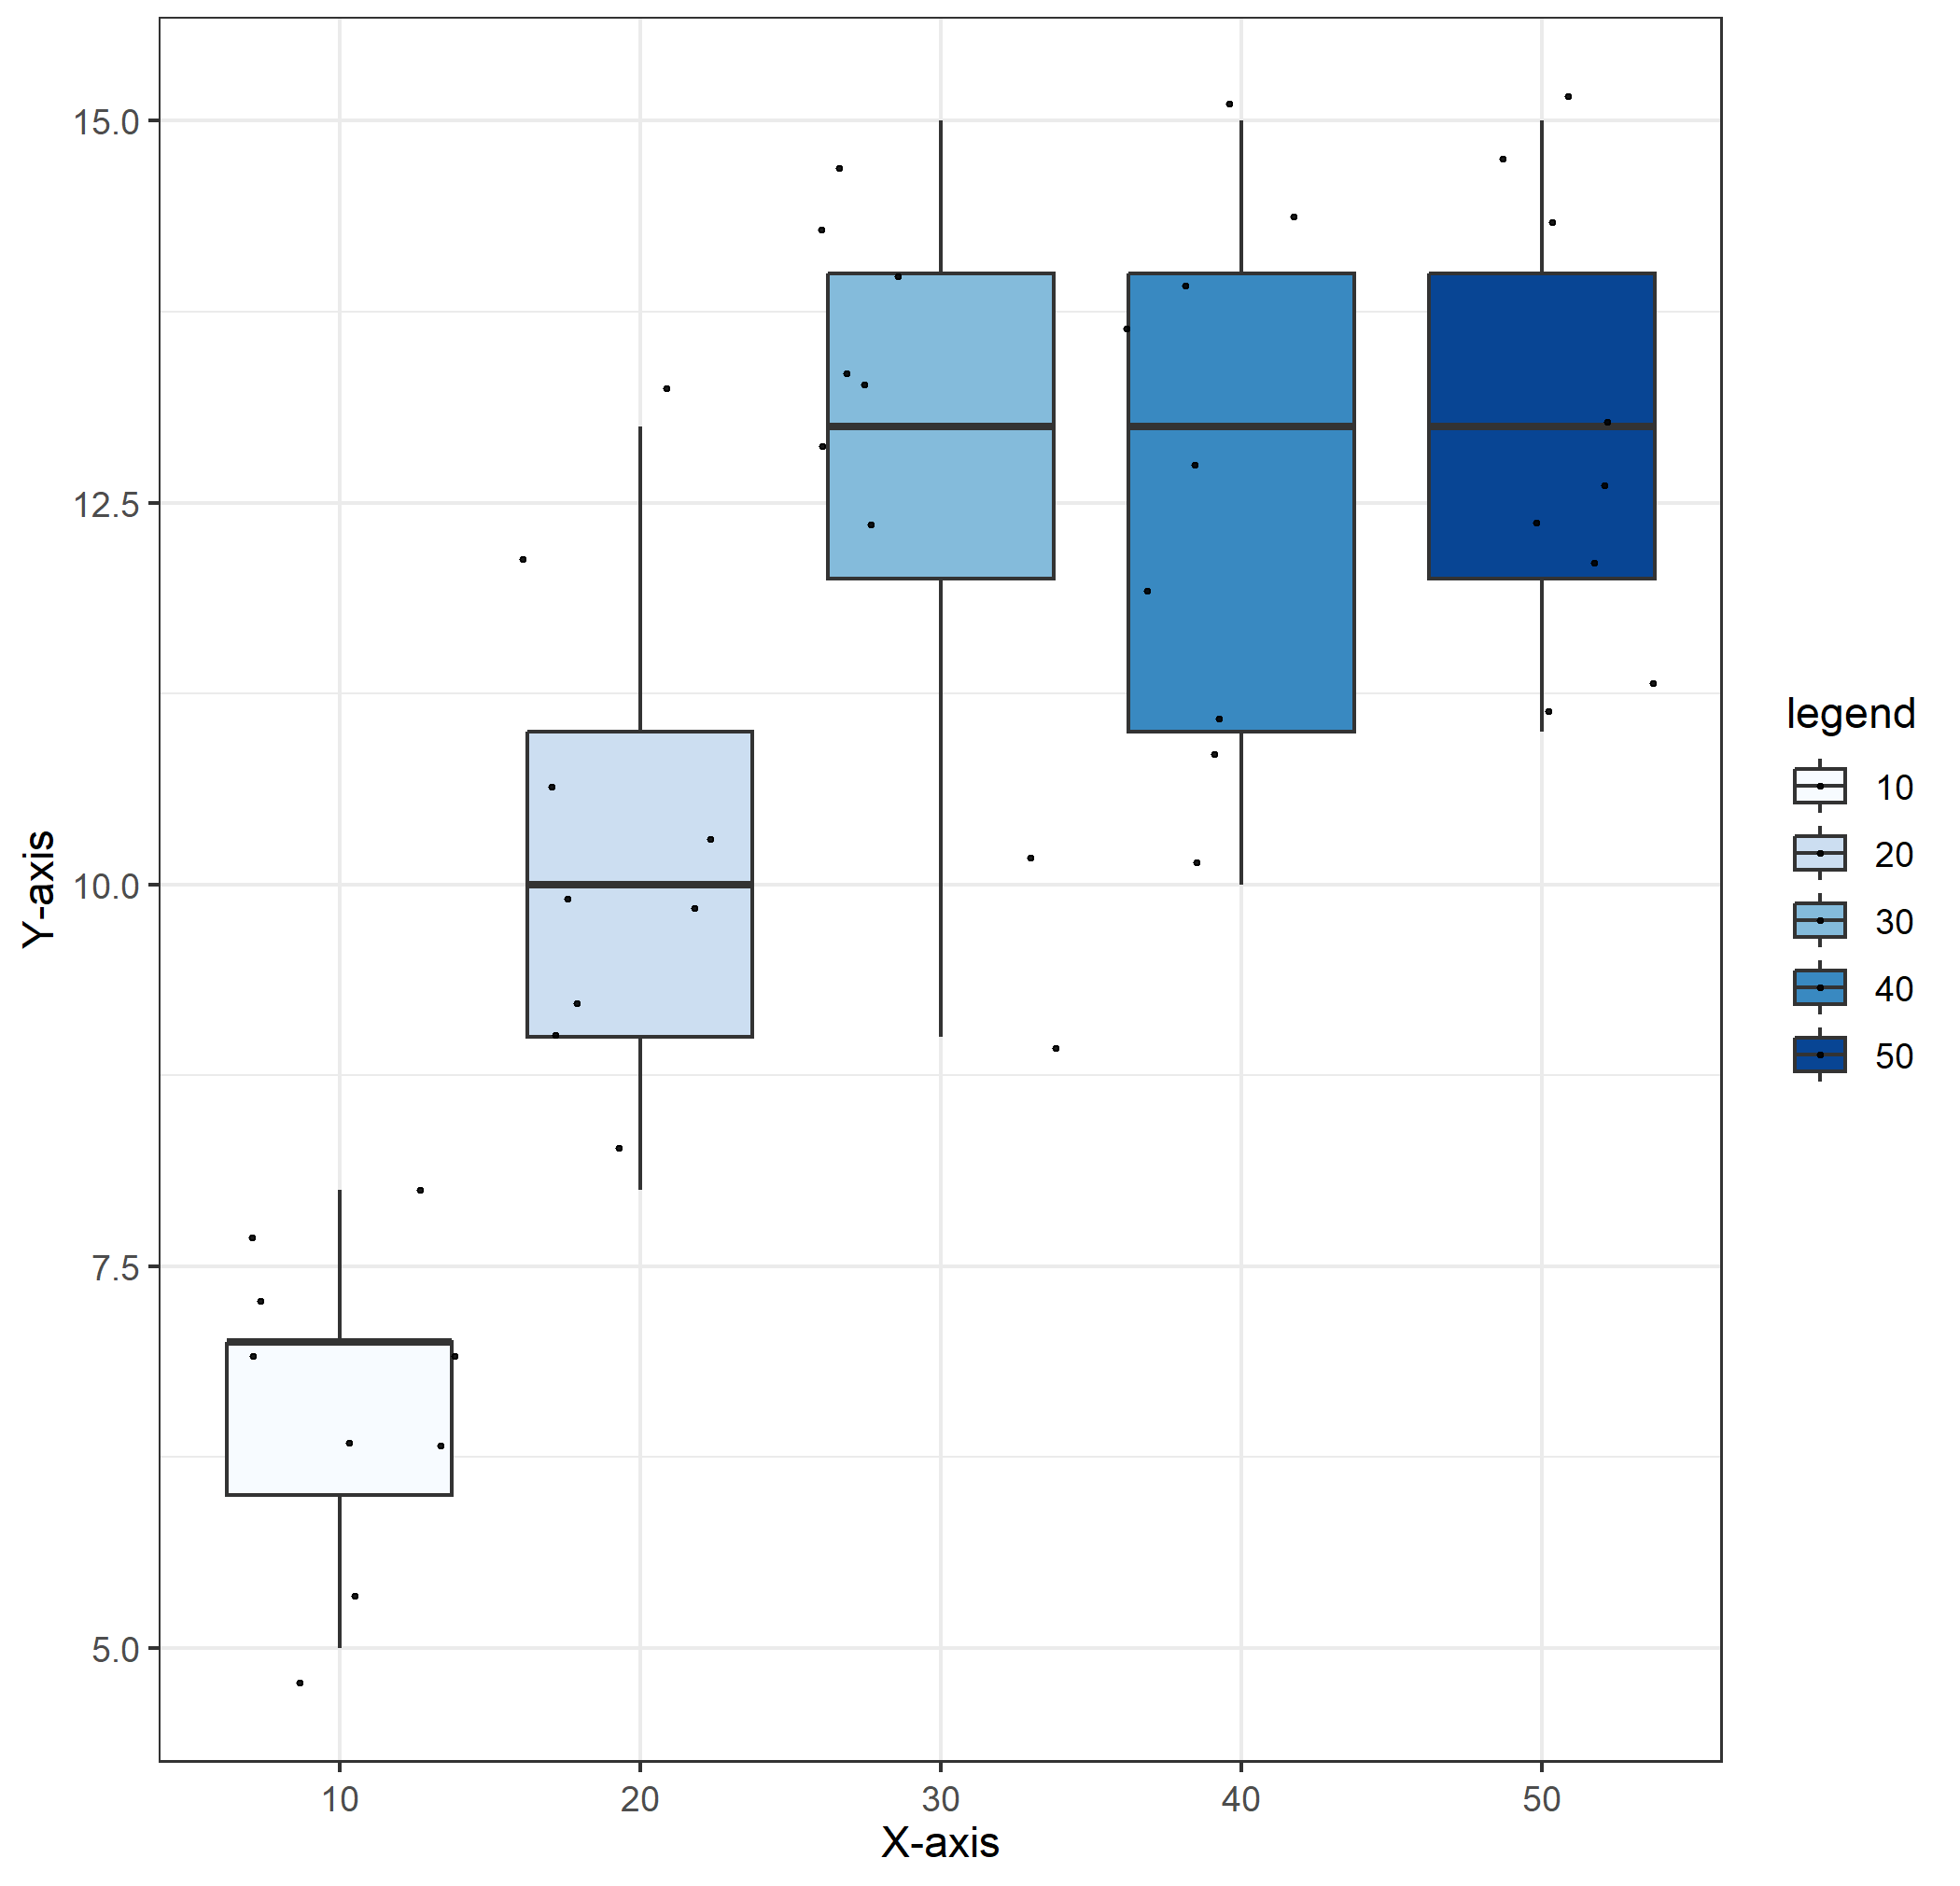
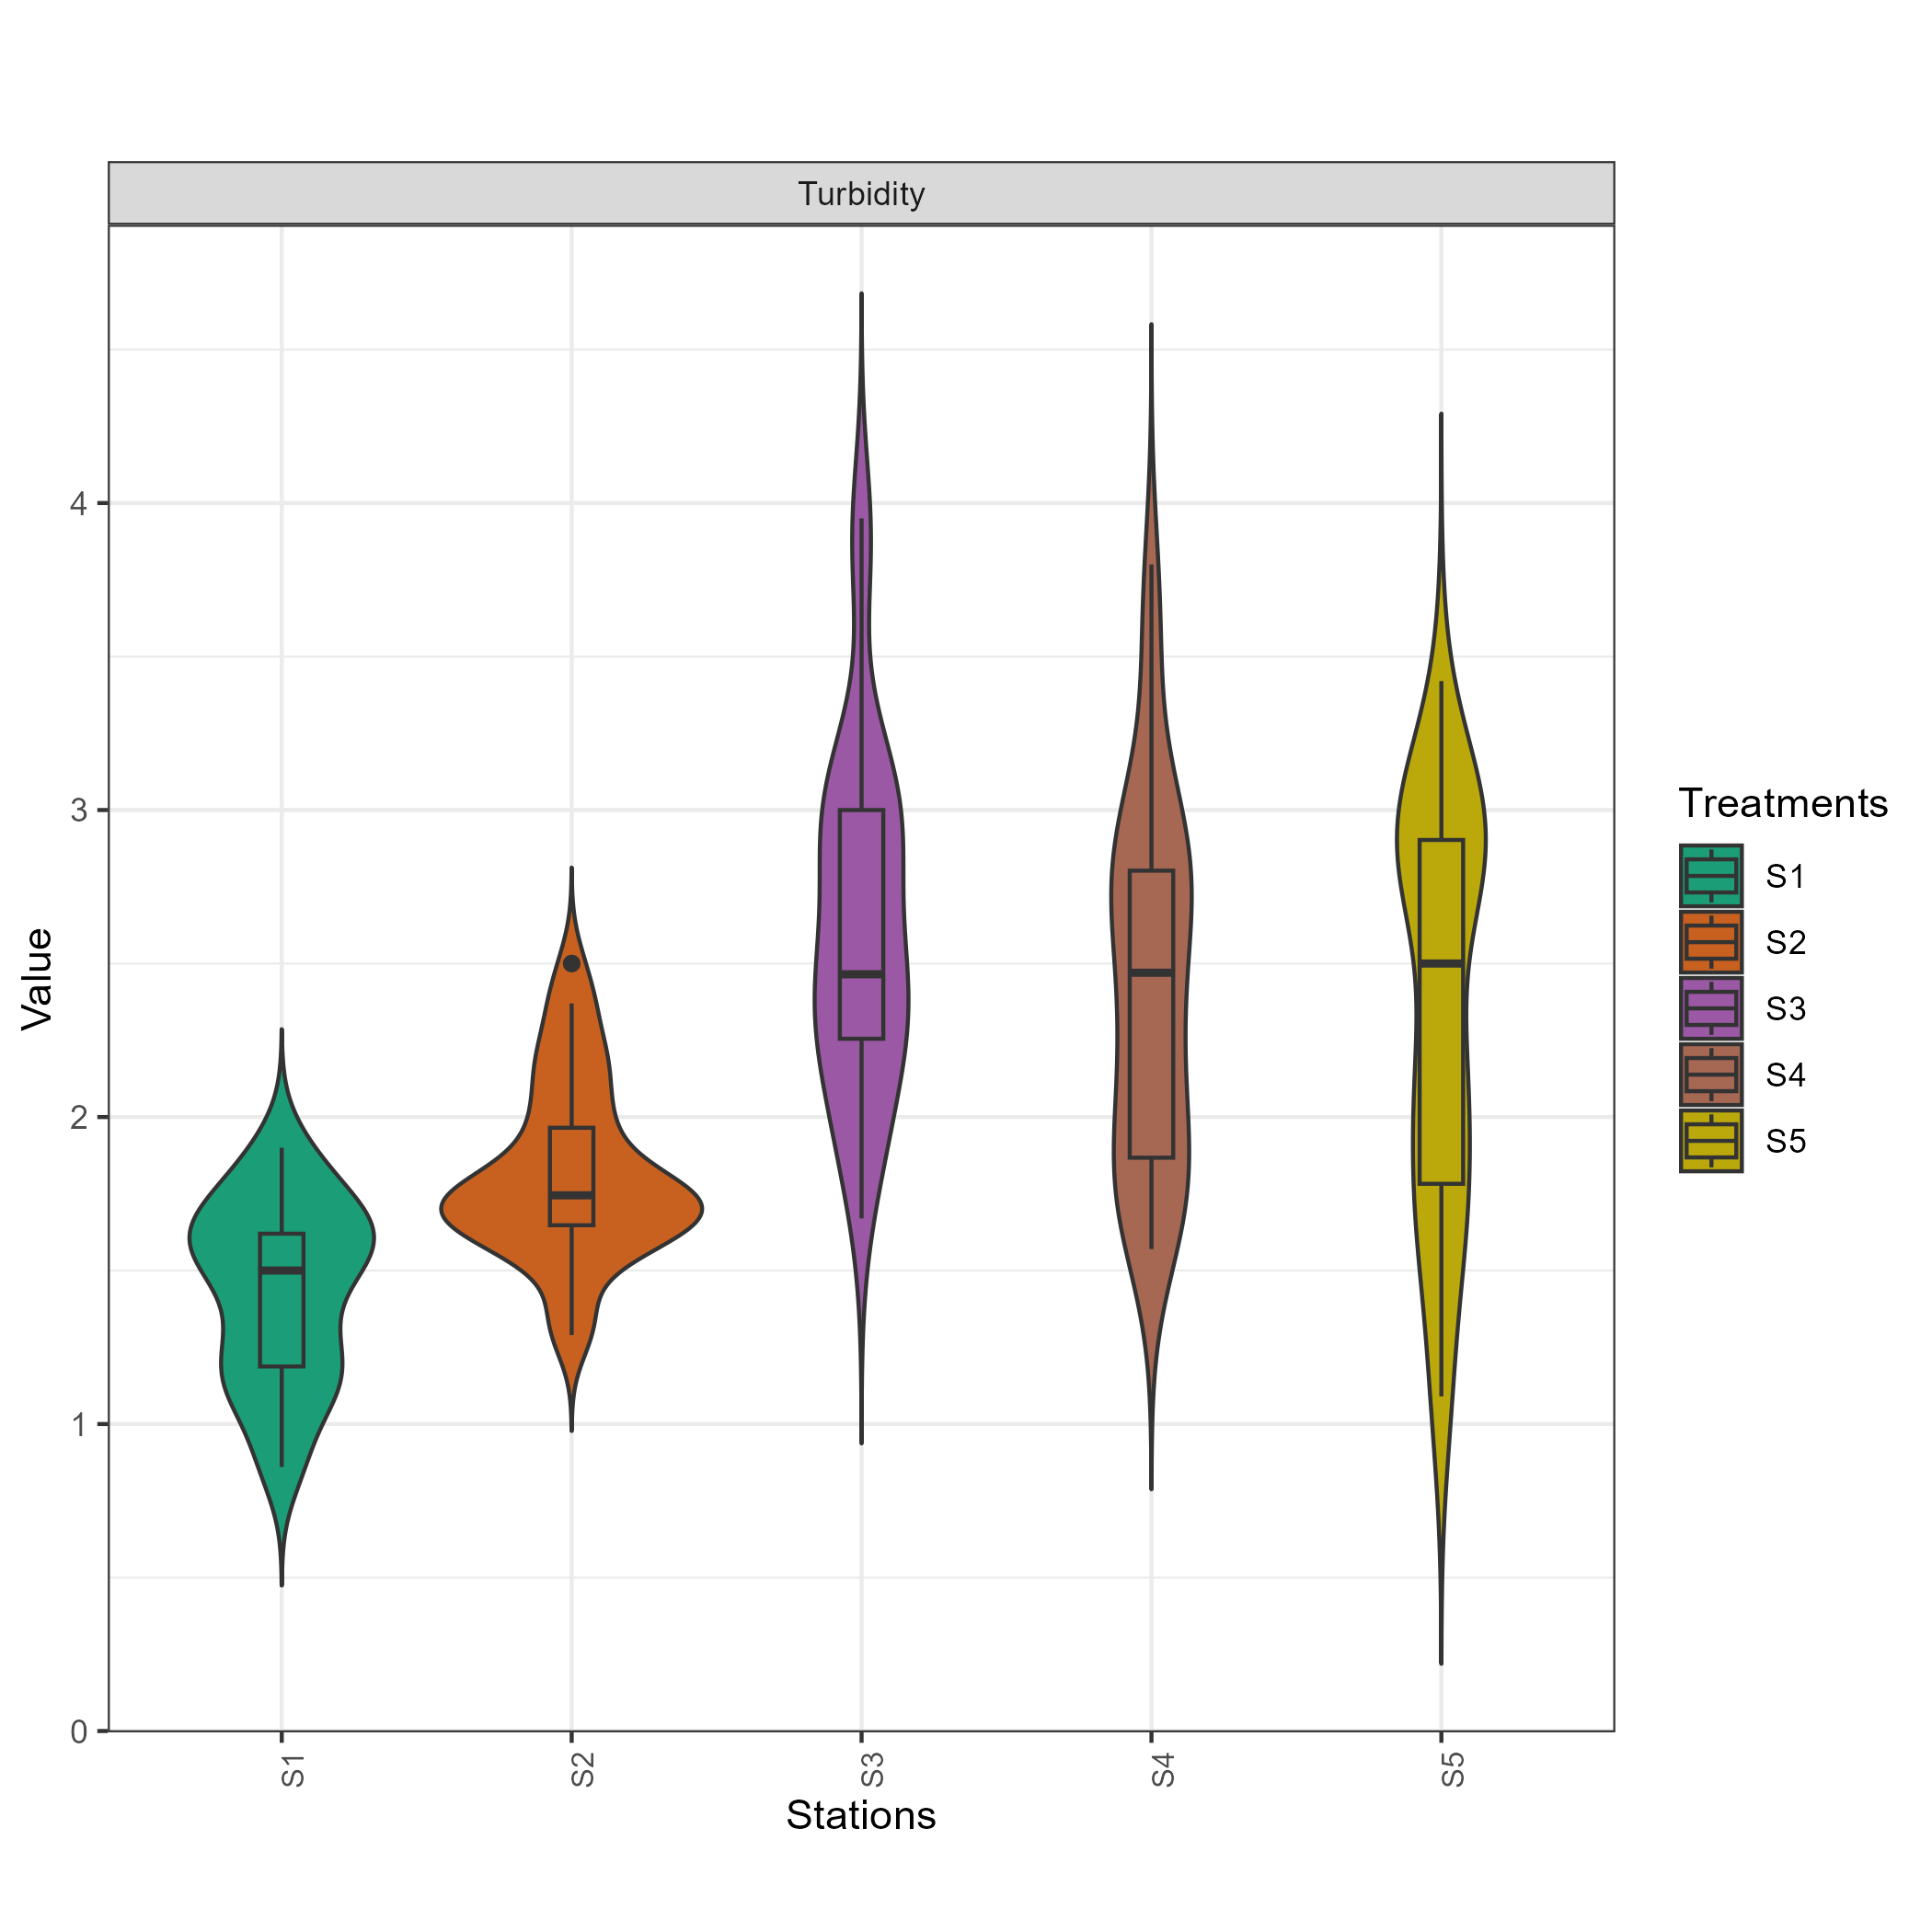
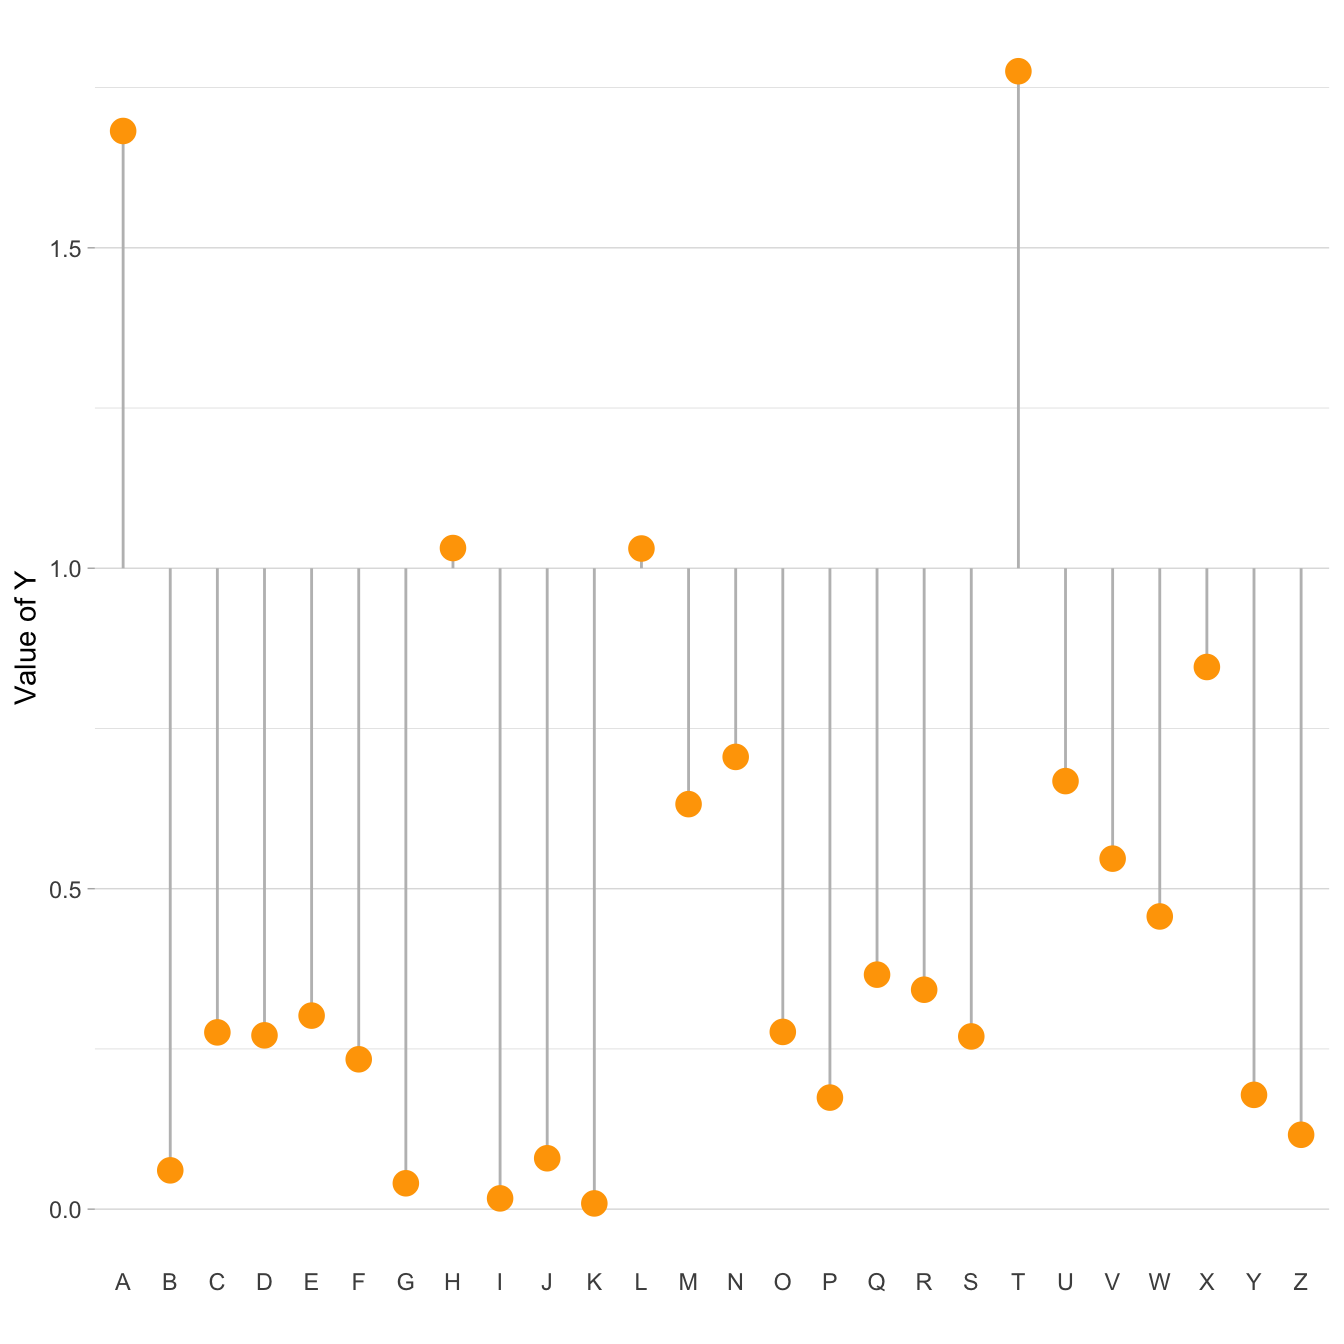
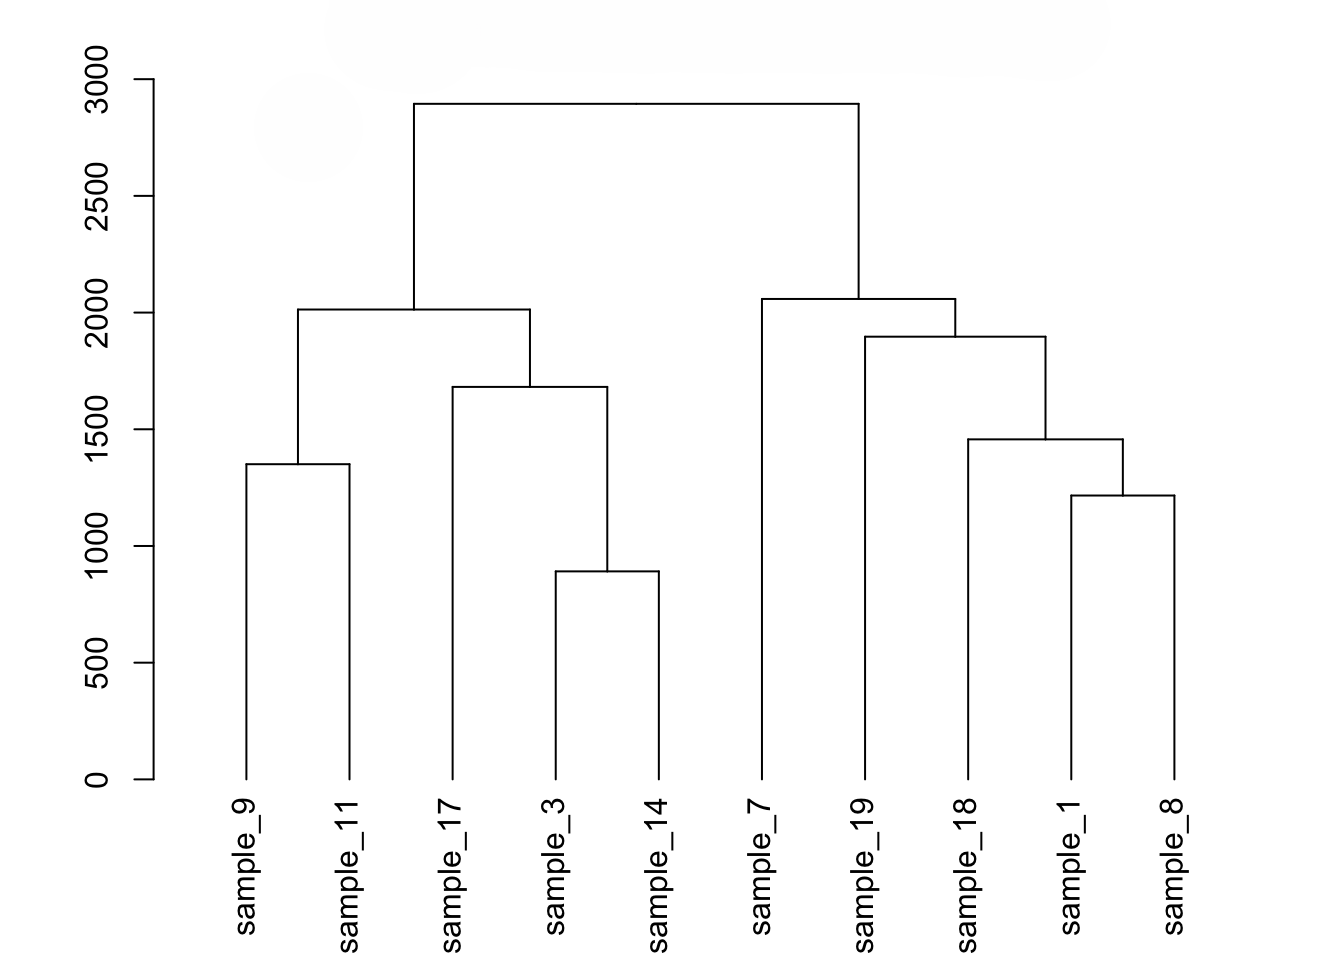
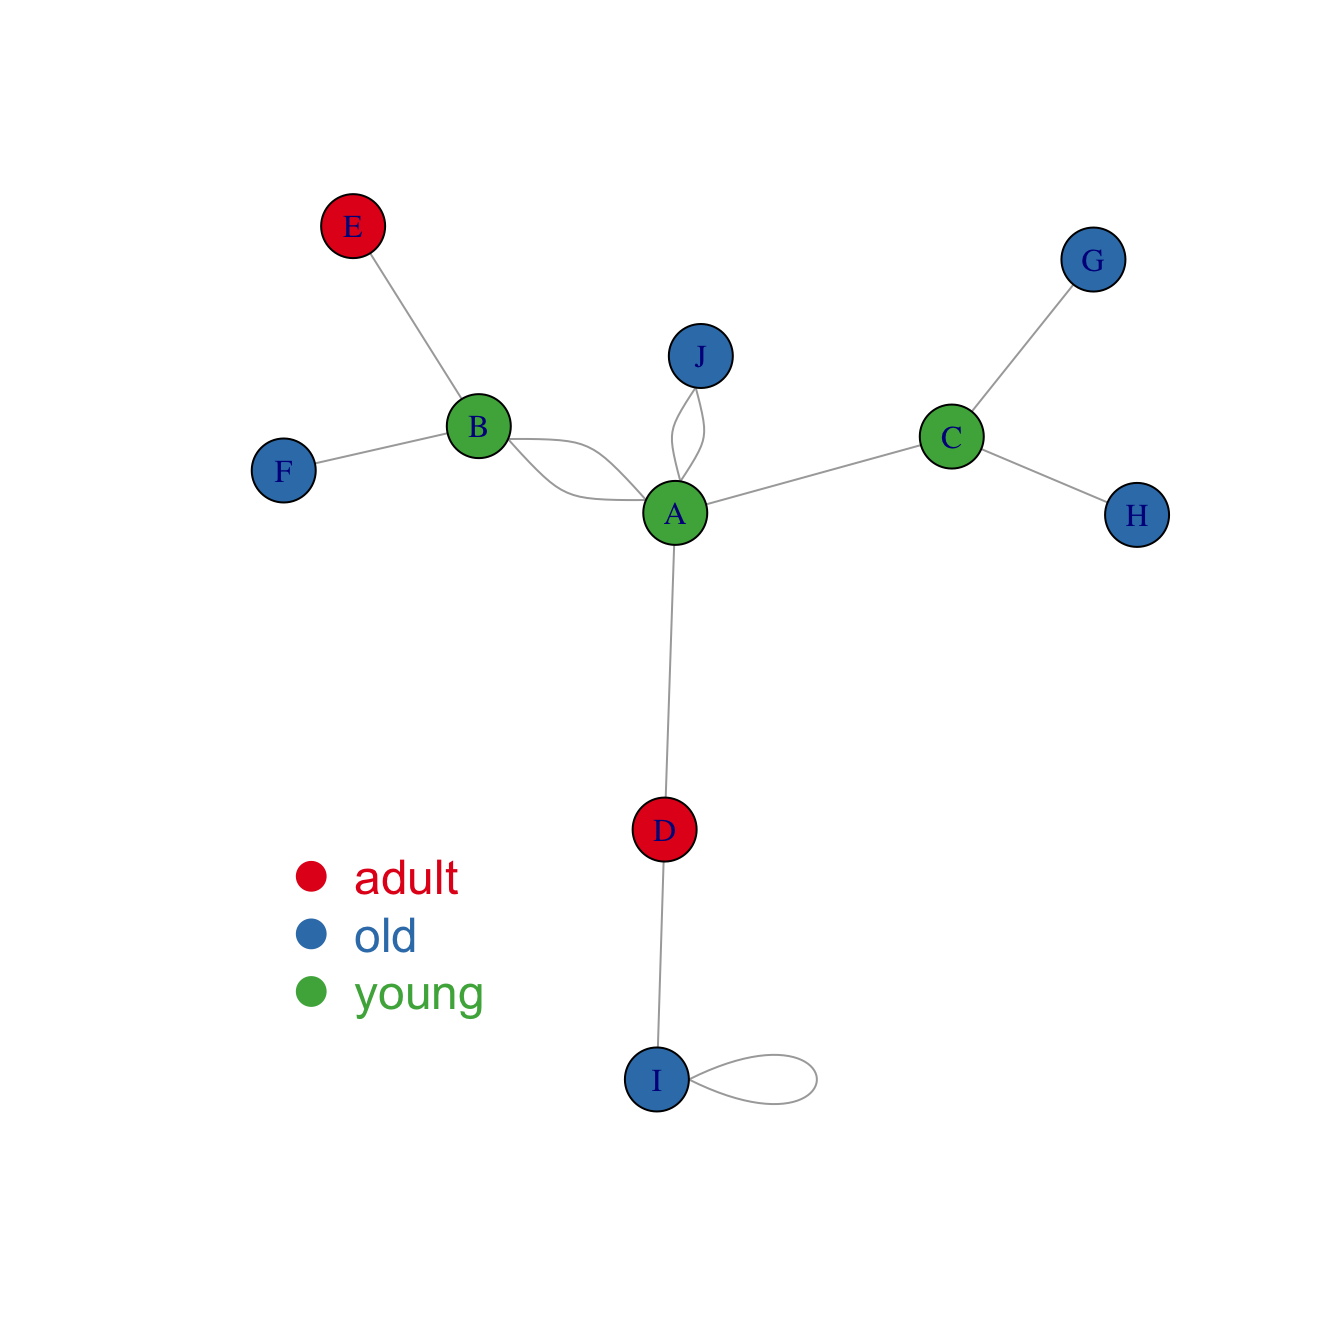
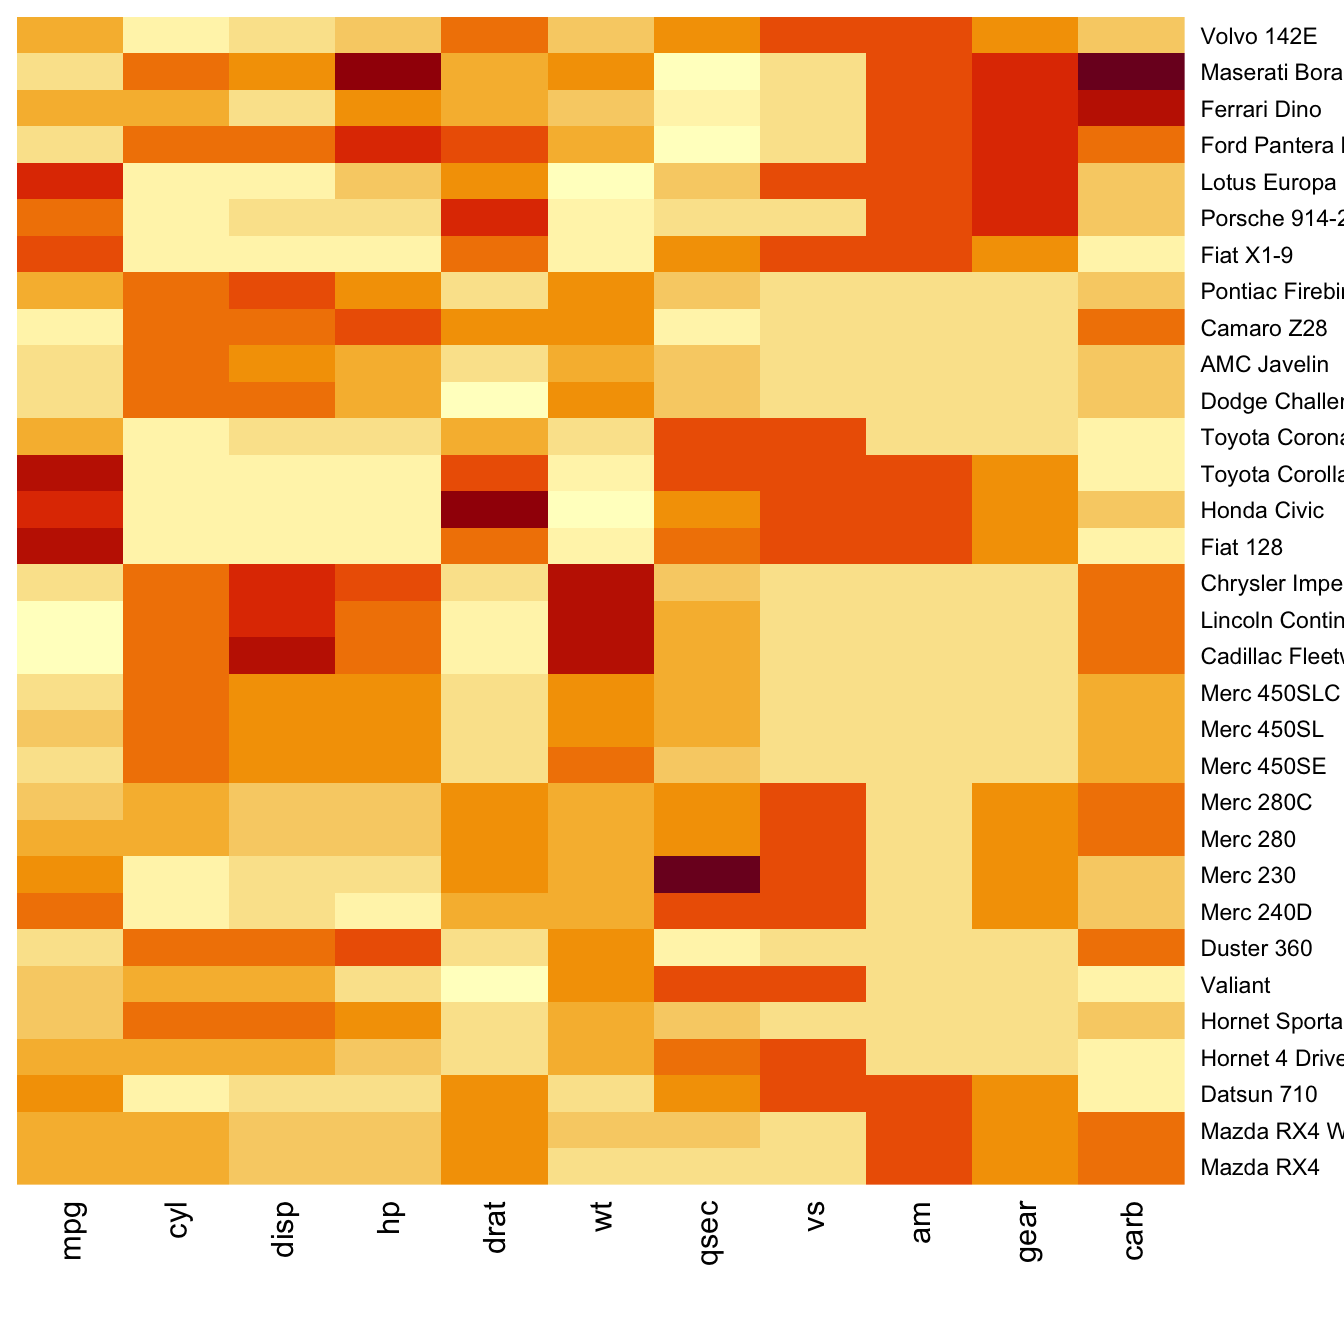
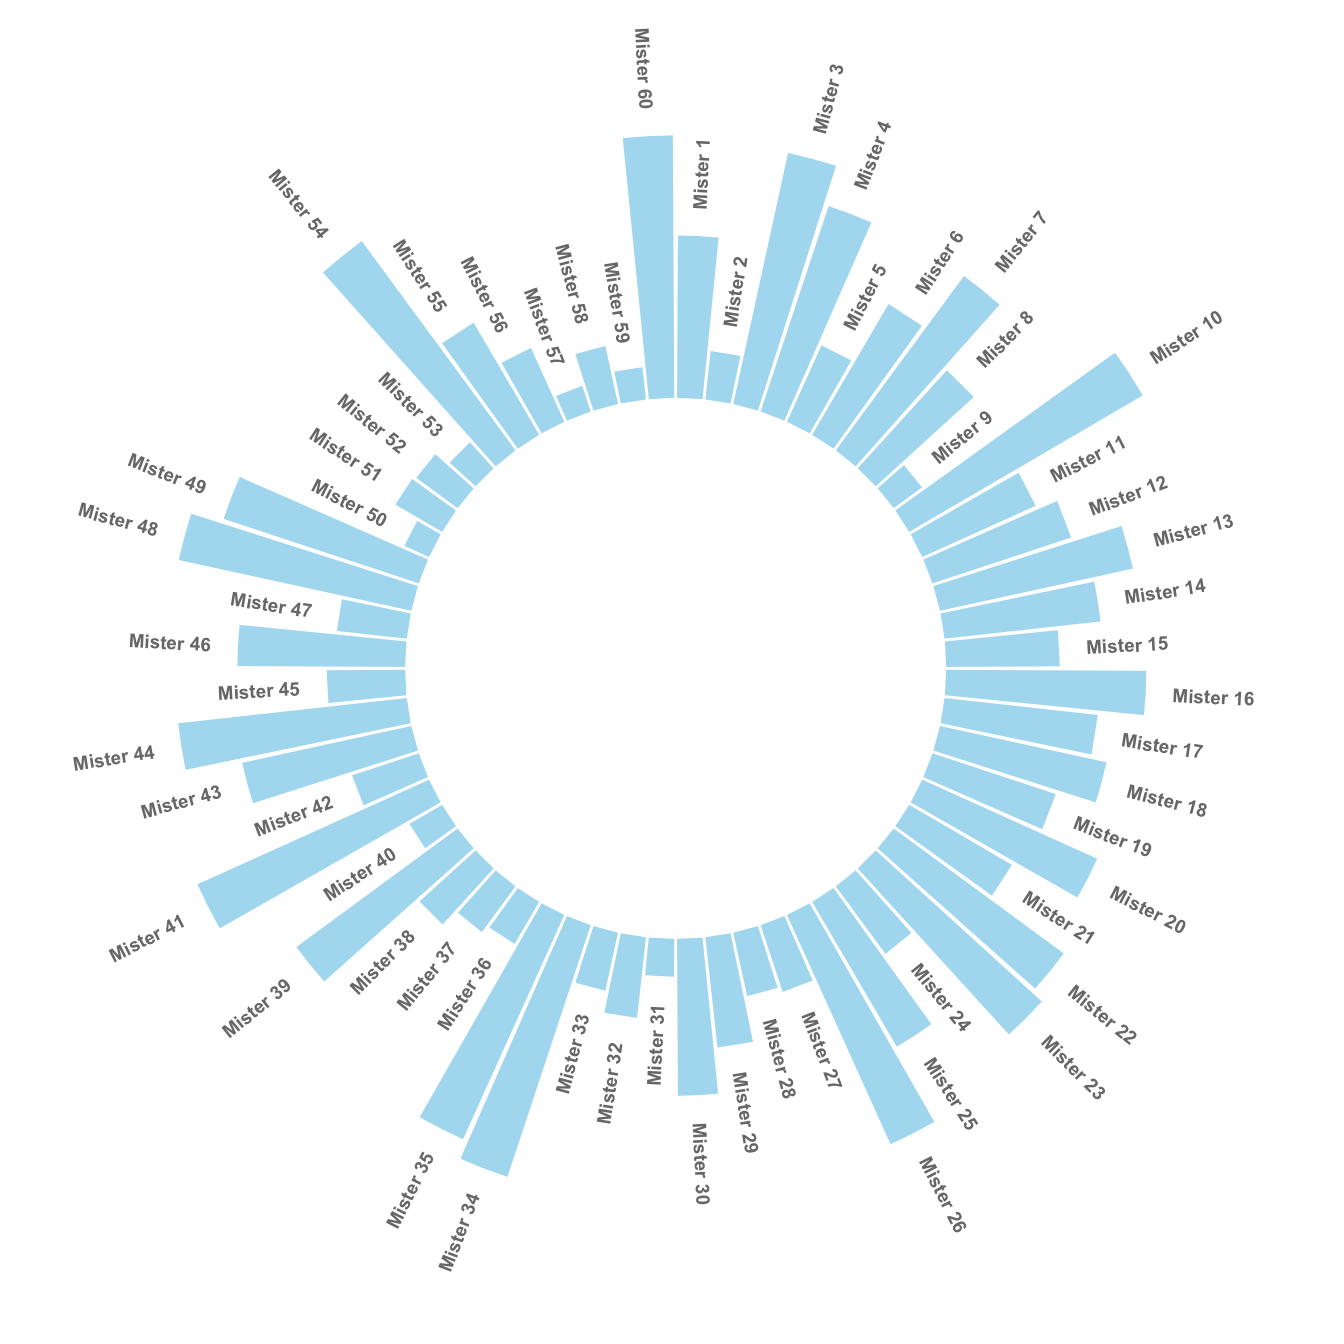
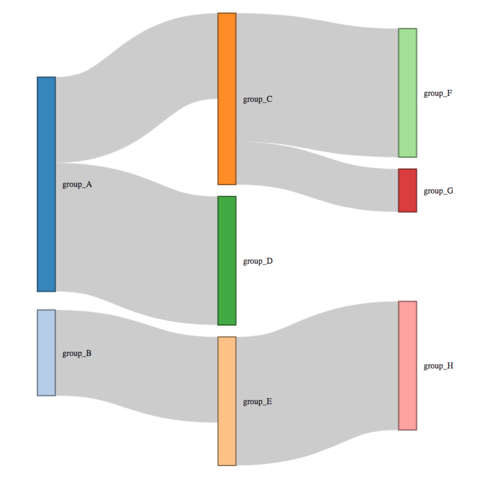
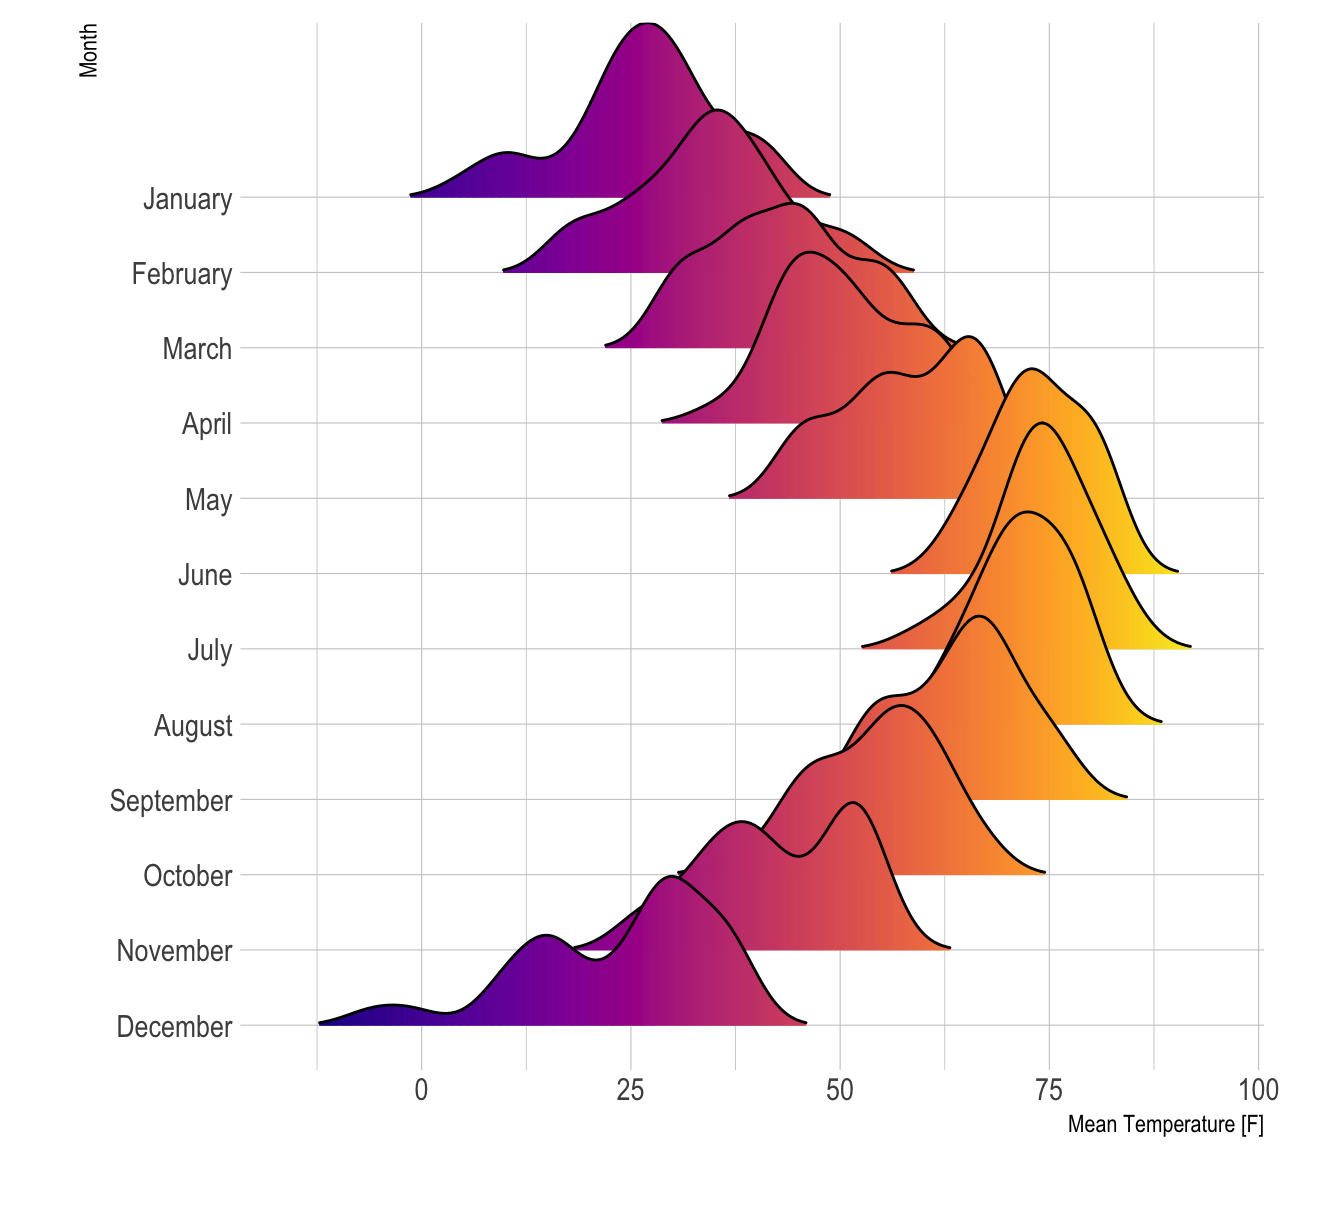
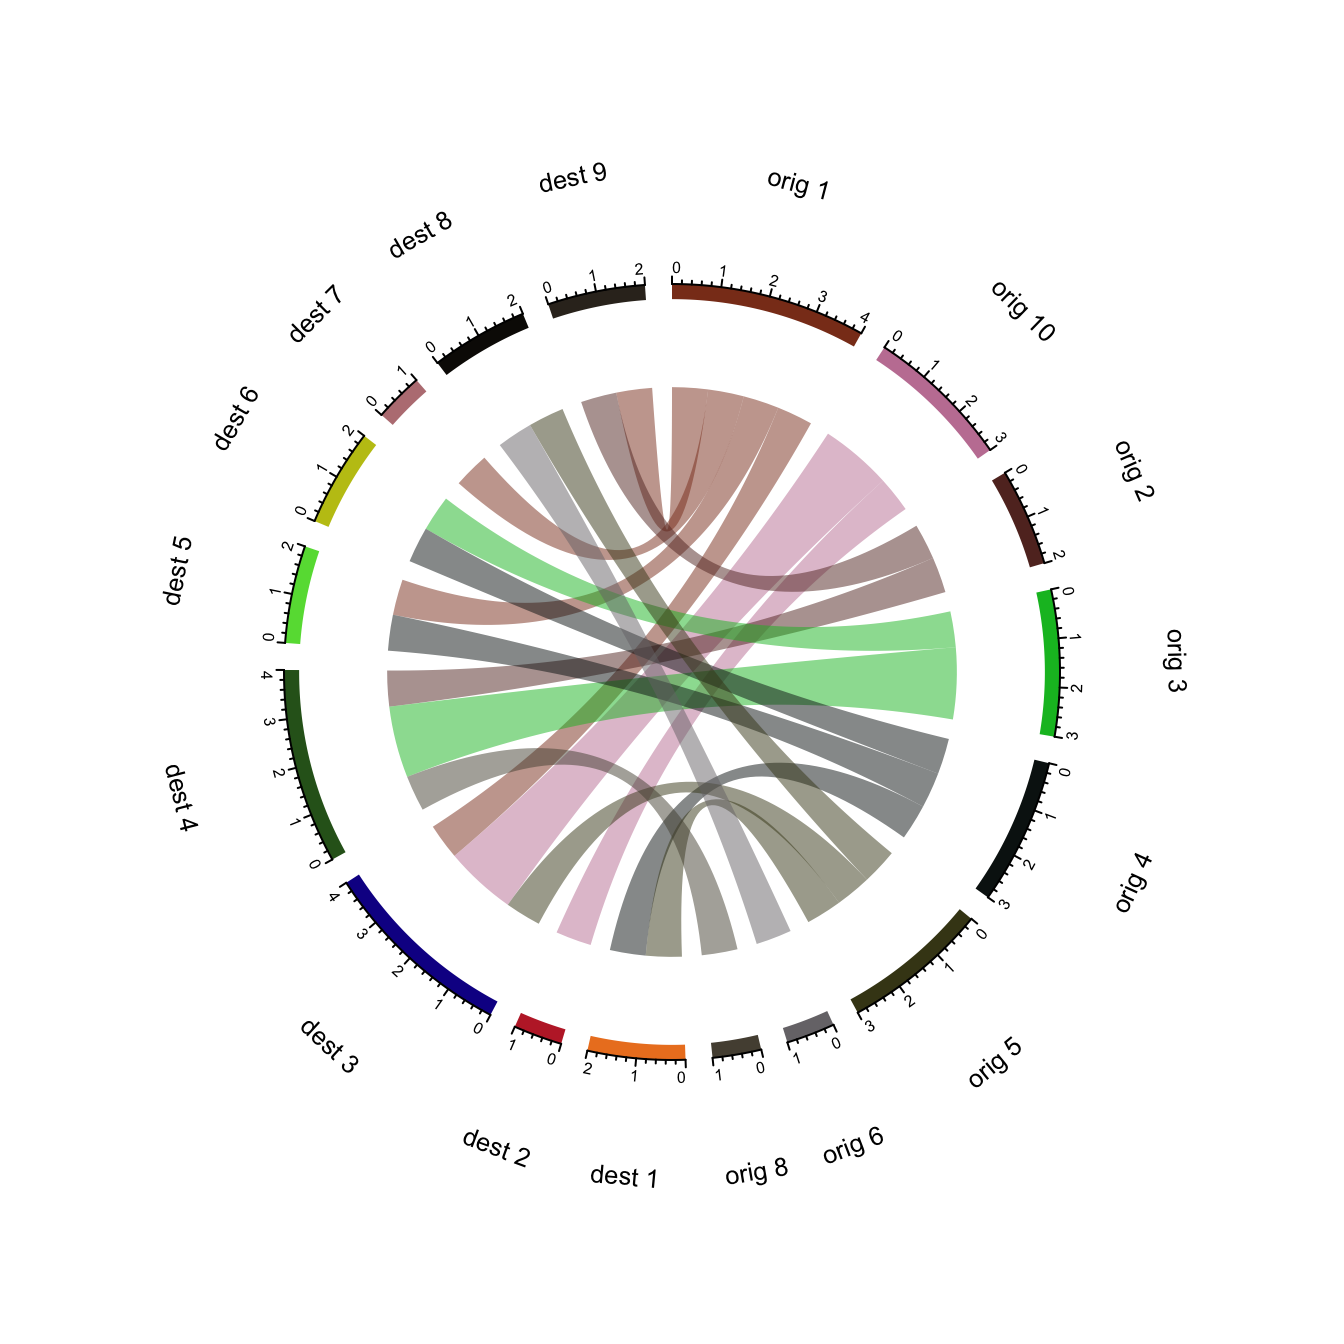
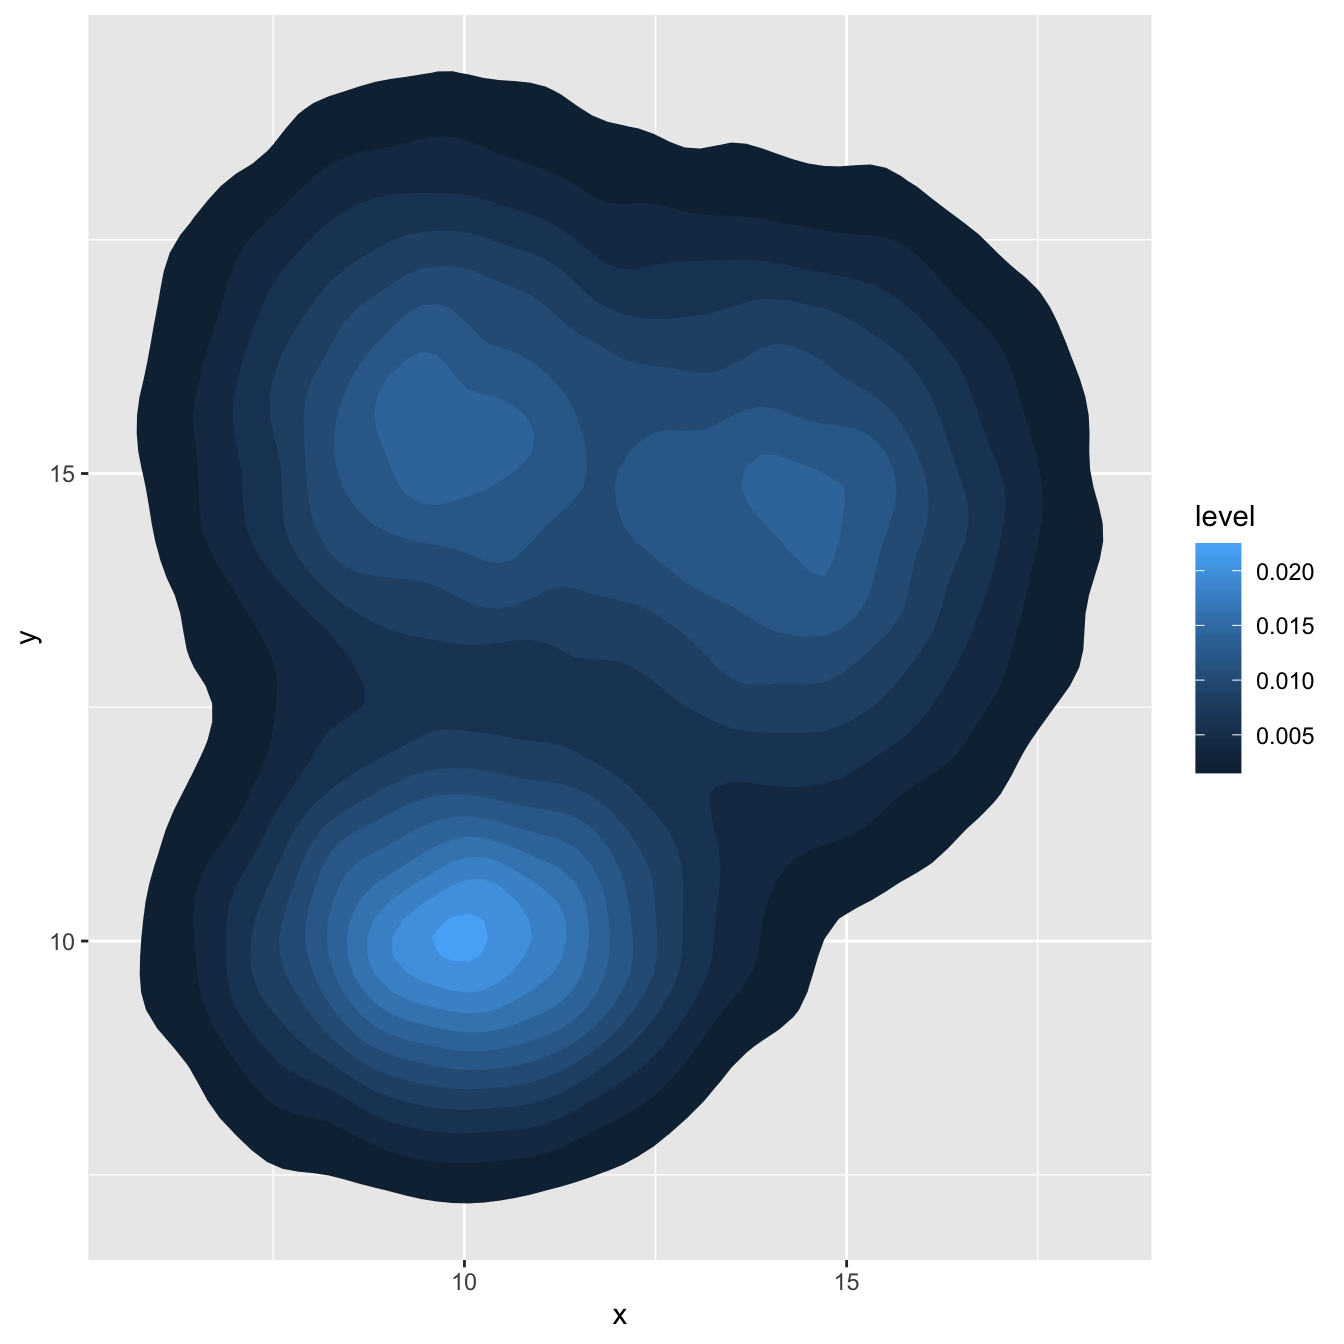
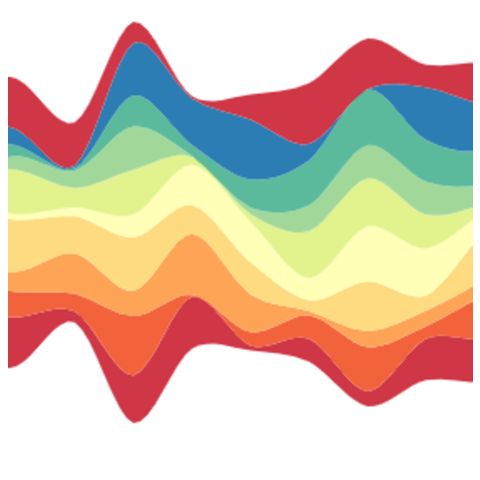
While this book focuses on basic plots and charts, significant advancements have been made in the field of data visualization. New types of graphs and charts have been developed to help in more effective representation and communication of data. Although a detailed discussion of these advanced graphs is beyond the scope of this book, we provide an overview of some common and recently developed types for reference. For more detailed information, you can explore resources such as The R Graph Gallery.
It is important to be aware of the wide variety of visualization tools available, as they can enhance your understanding of data and improve your ability to communicate insights clearly. From Figure 3.15 to Figure 3.26 you can see a few popular and advanced graph types widely used in modern data analysis.
3.10 Chapter Summary
Fill in the blanks
A __________ is a graphical representation of the frequency distribution of continuous data using adjacent rectangles.
In a histogram, the width of each rectangle represents the __________ interval.
When class intervals have equal widths, the height of a histogram rectangle is proportional to the __________.
When class intervals have unequal widths, the height of a histogram rectangle is proportional to the __________.
An ogive is also known as a __________ frequency curve.
There are two types of ogives: __________ and __________.
A less than ogive is constructed by plotting less than cumulative frequencies against the __________ class boundaries.
A greater than ogive is constructed by plotting greater than cumulative frequencies against the __________ class boundaries.
The intersection of the less than and greater than ogives gives the __________.
A frequency polygon is constructed by plotting class frequencies against the corresponding class __________.
A stem-and-leaf plot divides each observation into a __________ and a __________.
The leading digits of an observation form the __________ in a stem-and-leaf plot.
The trailing digits of an observation form the __________ in a stem-and-leaf plot.
A bar chart consists of bars of __________ width.
The three types of bar charts are __________, __________, and __________ bar charts.
In a component bar chart, each bar is divided into __________ parts.
A pie chart is a circular graph divided into __________.
The angle of a sector in a pie chart is proportional to the __________ represented by that category.
A boxplot is also known as a __________ plot.
A boxplot is based on the __________-number summary of a dataset.
The five-number summary consists of the minimum, Q1, __________, Q3, and maximum.
The interquartile range is represented by __________.
Observations falling below \(Q_1-1.5\times IQR\) or above \(Q_3+1.5\times IQR\) are considered __________.
A histogram is generally used for __________ data, whereas a bar chart is generally used for __________ data.
In a histogram, the bars are __________, whereas in a bar chart, the bars are separated by __________.
Short-answer questions
What is a histogram? Explain its main features.
Distinguish between a histogram and a bar chart.
Explain the use of frequency density in a histogram with unequal class widths.
What is an ogive? Name its two types.
Explain how a less than ogive is constructed.
Explain how a greater than ogive is constructed.
How can the median be obtained using ogives?
What is a frequency polygon? How is it constructed?
Explain the relationship between a frequency polygon and a histogram.
What is a stem-and-leaf plot? Explain its advantages.
Distinguish between the stem and leaf in a stem-and-leaf plot.
What is a bar chart? Name its different types.
Explain simple, component, and grouped bar charts.
What is a pie chart? Explain the steps involved in constructing a pie chart.
What is a boxplot? What information does it provide?
Explain the five-number summary used in a boxplot.
How are outliers identified in a boxplot?
List some advanced graphical methods used in modern data visualization.
Important formulae
Frequency density:
\[ \text{Frequency Density}=\frac{\text{Class Frequency}}{\text{Class Width}} \]
Angle of a sector in a pie chart:
\[ \text{Sector angle}= \frac{\text{Value of category}}{\text{Sum of category values}}\times360^\circ \]
Interquartile range:
\[ IQR=Q_3-Q_1 \]
Lower limit for identifying outliers in a boxplot:
\[ Q_1-1.5\times IQR \]
Upper limit for identifying outliers in a boxplot:
\[ Q_3+1.5\times IQR \]
Quick revision
- Histogram → continuous quantitative data; adjacent bars.
- Bar chart → categorical data; bars separated by gaps.
- Equal class width → height represents frequency.
- Unequal class width → height represents frequency density.
- Less than ogive → upper class boundaries + LCF.
- Greater than ogive → lower class boundaries + GCF.
- Intersection of two ogives → median.
- Frequency polygon → class midpoints + frequencies.
- Stem-and-leaf plot → retains individual observations.
- Simple bar chart → one value for each category.
- Component bar chart → shows components of each category.
- Grouped bar chart → compares multiple values within categories.
- Pie chart → sectors represent parts of a whole.
- Boxplot → five-number summary and spread of data.
- IQR → \(Q_3-Q_1\).
- Outliers in Boxplot → observations below \(Q_1-1.5IQR\) or above \(Q_3+1.5IQR\).
Answers to fill in the blanks
1. Histogram 2. Class 3. Frequency 4. Frequency density 5. Cumulative 6. Less than; Greater than 7. Upper 8. Lower 9. Median 10. Midpoints 11. Stem; Leaf 12. Stem 13. Leaf 14. Equal 15. Simple; Component; Grouped 16. Component 17. Sectors 18. Value 19. Box-and-whisker 20. Five 21. Median 22. \(Q_3-Q_1\) 23. Outliers 24. Continuous; Categorical 25. Adjacent; Gaps
“The power of data visualization: the coxcomb plot”
In 1854, a young nurse named Florence Nightingale arrived at a British military hospital in Scutari during the Crimean War and found conditions that horrified her: overcrowded wards, contaminated water, and almost no ventilation. Soldiers were dying by the thousands, and everyone assumed it was from battle wounds. Nightingale, who had been trained in mathematics and statistics from a young age, began meticulously recording the cause of every death. When she analysed her records, the pattern that emerged was staggering: for every soldier who died of wounds sustained in battle, roughly ten died of preventable diseases such as typhus, cholera, and dysentery, caused largely by unsanitary hospital conditions.
Knowing that dense tables of numbers would never move Queen Victoria or her officials to act, Nightingale invented a new kind of chart, the coxcomb diagram (a form of polar area diagram), where each wedge’s area, not just its radius, represented the number of deaths in a given month, colour-coded by cause. The diagrams made the scale of preventable deaths impossible to ignore at a glance. Her visual evidence persuaded the government to overhaul military hospital sanitation, and mortality rates fell sharply as a result. Nightingale went on to become the first female member of the Royal Statistical Society. Her work remains one of the earliest and most powerful examples of how a well-designed graph, more than any table of numbers, can drive real-world change.
“Statistics is the grammar of science”
- Karl Pearson